
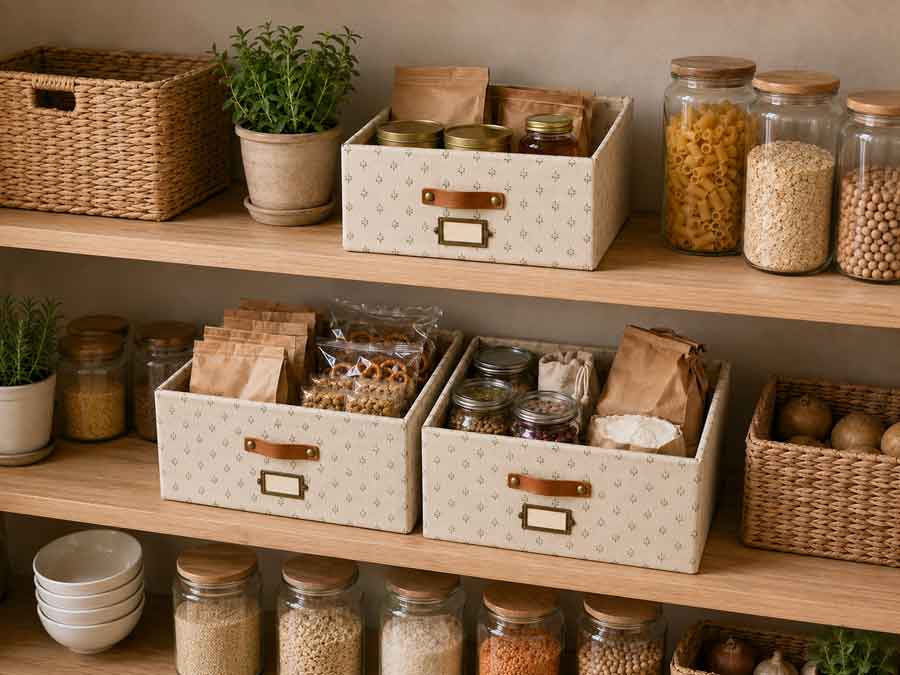
Attractive storage boxes can make open shelves and closets feel more orderly, but buying enough matching containers to organize an entire space can quickly become expensive. Fabric-wrapped storage boxes offer a practical alternative. With a sturdy cardboard box, a favorite textile, and a few basic craft supplies, you can create customized storage that looks polished enough to leave on display.
This project is also an excellent way to reuse materials you may already have. Shipping cartons, shoeboxes, fabric remnants, old curtains, and even sturdy table linens can all be transformed into useful organizers. Make a matching set for a bookcase, coordinate several different patterns within one color palette, or cover a single box to fit a particularly awkward shelf.
The wrapping process is straightforward, but careful measuring and a little patience make a noticeable difference. Taking time to smooth the fabric, reduce bulk at the corners, and finish the interior edge will help an ordinary cardboard box look more like a purpose-made storage bin.
Why Fabric-Wrapped Boxes Work So Well
Cardboard boxes are useful, inexpensive, and available in nearly every size imaginable. Their plain surfaces and printed markings, however, do not always suit spaces where storage remains visible. Covering a box with fabric disguises its utilitarian origins while adding color, pattern, and texture to the room.
Unlike store-bought bins, fabric-wrapped storage boxes can be tailored to fit a specific shelf or storage need. A shallow box can organize mail and paperwork in a home office, while a deeper one can hold toys, craft supplies, seasonal accessories, or extra linens. Small boxes work well for cords, stationery, and sewing notions. Boxes with lids can conceal photographs, keepsakes, and items that are used less frequently.
The project is especially effective when several boxes are displayed together. Even if the boxes are not exactly the same size, repeating a fabric or color palette gives them a coordinated appearance. This makes fabric wrapping a useful option for organizing built-in shelves, cubbies, bookcases, and closets without purchasing an entirely new storage system.
Choose a Sturdy Box
The finished organizer will only be as durable as the box underneath it, so begin with cardboard that is clean, dry, and structurally sound. Look for boxes with straight sides, firm corners, and a bottom that does not bow when lifted. Corrugated shipping cartons are typically stronger than lightweight product packaging and are a good choice for larger storage bins.
Choose a box according to where it will be used and what it will hold. Measure the shelf or cubby before committing to a size, leaving enough clearance to slide the finished box in and out comfortably. Remember that folded fabric, interior lining, and decorative handles can add slightly to the box’s final dimensions.
A standard shipping box can easily be converted into an open-top bin. Cut away the upper flaps with a craft knife, using a metal ruler as a guide if you want an especially straight edge. Alternatively, fold the flaps inside and glue them against the walls to create a sturdier rim. If the box has a separate lid, you can wrap it as well to create covered storage.
Avoid boxes that have been exposed to moisture, grease, or strong odors. Fabric and adhesive will not correct warped cardboard, and stains may eventually show through light-colored material. It is better to wait for a sound box than to invest time covering one that will not hold its shape.
Select the Right Fabric
Medium-weight woven fabrics are generally the easiest to use for this project. Cotton, canvas, linen blends, denim, and lightweight upholstery fabrics provide enough coverage to conceal the cardboard without becoming excessively bulky at the corners. Quilting cotton is particularly beginner-friendly because it cuts neatly, folds easily, and comes in a wide range of colors and patterns.
Very thin fabric may allow logos or printing on the box to show through. If you want to use a pale or lightweight material, first cover the cardboard with white craft paper or apply a thin coat of white paint and allow it to dry completely. At the other end of the spectrum, heavy upholstery fabric can be difficult to fold cleanly, especially around small boxes and narrow corners.
Avoid highly stretchy knits and slippery fabrics for your first attempt. Both tend to shift while the adhesive is being applied, making it harder to keep the grain and pattern straight. Fabrics that fray heavily can also require additional trimming or folded seams.
Consider how the print will look once it is wrapped around the box. Small allover patterns are forgiving because minor shifts are less noticeable. Stripes, plaids, checks, and directional motifs require more precise placement. Before cutting, decide which section of the fabric you want centered on the front and make sure any directional design will be upright.
Fabric remnants are ideal for small organizers, while old curtains, tablecloths, and clean canvas drop cloths can provide enough material for a coordinated set. Whatever fabric you choose, press it before measuring. Creases trapped beneath the adhesive are difficult to remove later.
Supplies and Tools
Gather everything before you begin so that you can work continuously once the adhesive has been applied. You will need:
- A clean, sturdy cardboard box
- Enough fabric to cover the box
- A measuring tape or ruler
- Fabric scissors or a rotary cutter and cutting mat
- A fabric marker, tailor’s chalk, or pencil
- Fabric-safe spray adhesive or decoupage medium
- A foam brush if using decoupage medium
- A hot-glue gun and glue sticks
- A craft knife
- Strong packing tape for reinforcement
- Optional lining fabric or decorative paper
- Optional ribbon, trim, label holders, leather tabs, or rope for handles
Spray adhesive typically produces the smoothest exterior because it covers a large surface with a thin, even layer. Always follow the manufacturer’s directions and use it in a well-ventilated workspace while protecting the surrounding surface from overspray.
Decoupage medium is easier to control indoors and can be brushed directly onto the cardboard, but applying too much may saturate or warp the box. Hot glue works well for securing folded edges, corners, and decorative details. It is less suitable for covering broad panels because it cools quickly and may leave raised lines beneath the fabric.
Prepare and Reinforce the Box

Remove shipping labels, loose tape, and torn pieces of paper from the box. Adhesive does not need a perfectly pristine surface, but obvious ridges and debris may remain visible beneath the fabric. If a label cannot be removed cleanly, cover it with a piece of kraft paper or cardstock to level the surface.
Check the bottom and each corner for weakness. Reinforce seams from the inside with packing tape, pressing the tape firmly into place. For a box that will hold moderately heavy objects, add a second piece of corrugated cardboard to the bottom. Cut it to fit snugly inside and secure it before adding the lining.
If you removed the top flaps, examine the cut edge and trim away any rough cardboard. For a sturdier upper rim, leave approximately 2 inches of each flap attached, fold the remaining sections inward, and glue them against the interior walls. This creates a doubled edge that is less likely to bend when the box is pulled from a shelf.
Finish by wiping the box with a dry cloth to remove dust. Make sure any paint, tape, or glue used during preparation is completely dry before you begin working with the fabric.
Measure and Cut the Fabric


There are two main ways to cover a box. You can wrap the exterior with one continuous piece of fabric, or you can cut separate panels for each side. A continuous wrap creates fewer visible seams and is usually faster, while individual panels can be easier when working with structured fabric or a pattern that needs to be carefully aligned.
For a continuous wrap, measure the distance around all four sides of the box. Add approximately 1 inch for the final seam overlap. Measure the box’s height, then add enough fabric to fold about 1 to 2 inches over the upper edge and 1 to 2 inches beneath the bottom. The larger the box, the more generous these allowances can be.
Mark the measurements on the wrong side of the fabric and cut a straight rectangle. If the fabric has a directional print, double-check its orientation before cutting. It is helpful to temporarily position the fabric around the box with clips or painter’s tape so you can see where the pattern and final seam will fall.
For the bottom, cut a separate fabric rectangle slightly smaller than the box’s base. This panel will cover the folded edges after the sides have been wrapped, giving the underside a neater finish. If you plan to line the box, also cut fabric for the interior walls and a cardboard insert for the bottom.
Wrap the Outside of the Box


Choose one vertical corner to serve as the starting and ending point. A back corner is usually best because the final seam will be less noticeable when the box is displayed. Position the fabric so that the lower allowance extends beyond the bottom and the upper allowance rises above the rim.
Apply adhesive to the first side of the box in a light, even layer. Do not coat the entire box at once; working one panel at a time gives you more control and prevents the adhesive from drying too quickly. Place the fabric against the surface and smooth it from the center toward the edges with your hands or a clean plastic scraper.
Move to the next side, keeping the fabric gently taut as you turn the corner. The goal is to remove slack without stretching the fabric or distorting its pattern. Continue around the box, checking frequently that the upper and lower allowances remain even.
When you reach the starting point, fold the raw edge of the fabric under by approximately ½ inch. Add a narrow line of fabric glue or hot glue beneath the fold and overlap it neatly over the starting edge. Press the seam firmly and hold it in place until secure.
If a wrinkle appears while the adhesive is still workable, carefully lift the fabric and smooth it again. Do not continue pressing over a crease in the hope that it will disappear. Correcting it immediately will give you a much cleaner result.
Create Neat Corners and Edges
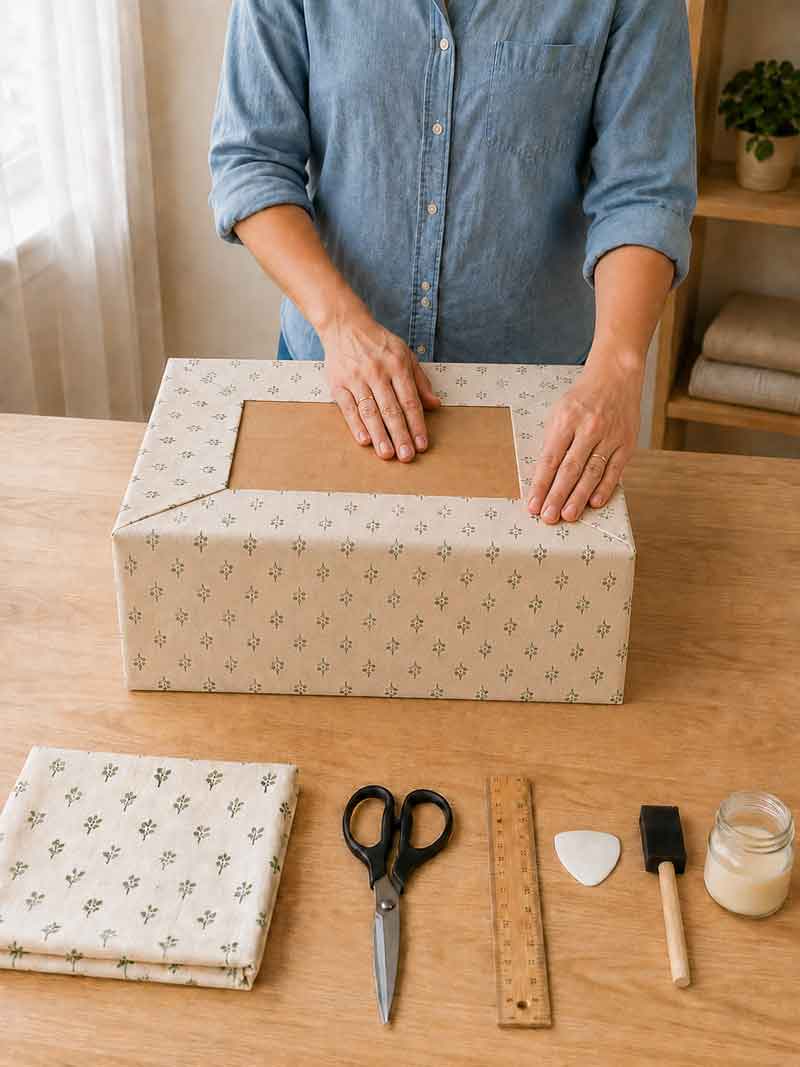

Once the sides are covered, turn the box upside down. At each bottom corner, trim away some of the excess fabric to reduce bulk, leaving enough material to cover the cardboard completely. Fold the fabric inward as you would when wrapping a gift, creating a flat diagonal fold at each corner.
Secure the long edges first, smoothing the fabric across the bottom. Fold in the short ends and glue them over the first folds. The underside does not have to be perfect, but keeping the layers flat will prevent the box from wobbling on a shelf.
Cover the folded edges with the separate bottom panel you cut earlier. Turn its raw edges under or use pinking shears if the fabric is not prone to fraying. Center the panel over the base and glue it into place. Although this area will rarely be seen, the extra panel creates a tidy finish and helps protect the folded fabric.
Return the box to an upright position. Trim the fabric above the rim where necessary, leaving an even allowance. Cut a small diagonal slit at each corner, stopping just before the cardboard. Fold the fabric over the rim and secure it to the inside walls. Work slowly so that the exterior corners remain smooth and the folds lie flat.
A thin line of hot glue works particularly well along the interior edge. Apply only a short section at a time, press the fabric into place, and protect your fingers from the heated glue.
Finish the Interior
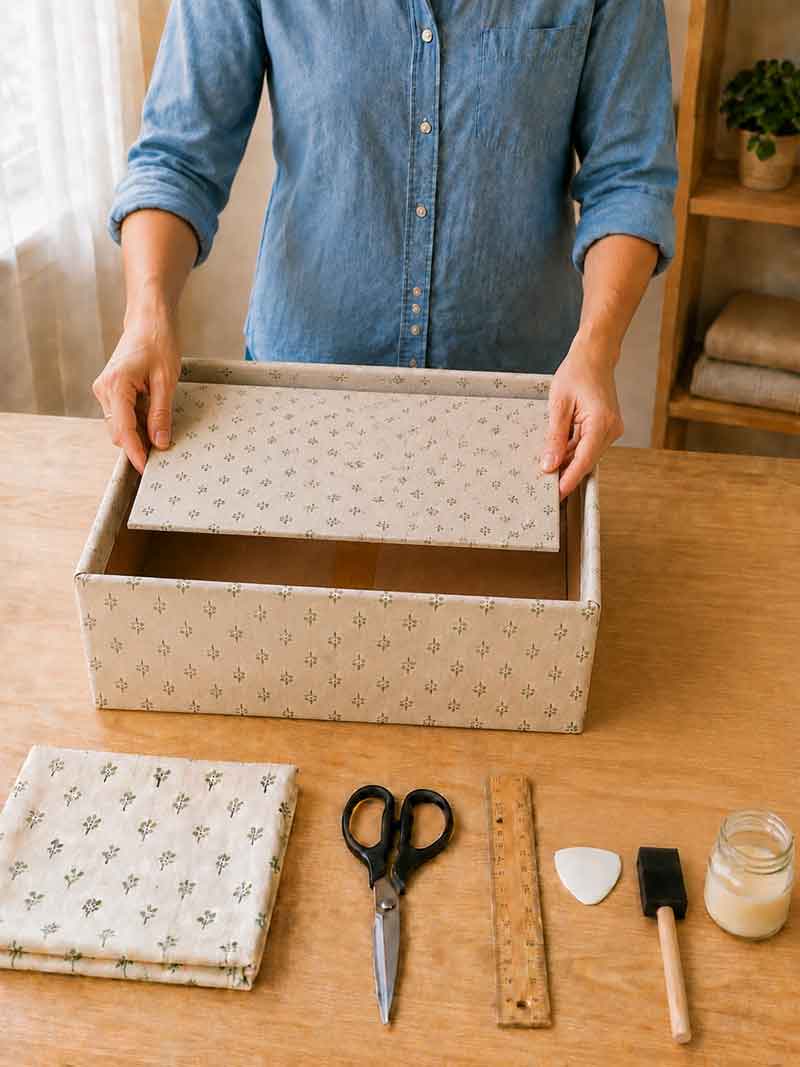
For a quick and simple finish, the exterior fabric can stop a few inches below the inside rim. This is often sufficient for boxes that will hold tall objects or sit above eye level. Choose a neat, consistent stopping point and make sure every folded edge is firmly attached.
For a more polished box, cover the entire interior with a coordinating fabric or decorative paper. Measure each interior wall separately and cut panels slightly smaller than the cardboard surfaces. Turn under the visible fabric edges before gluing the panels in place. Install the side panels first and finish with the bottom.
A removable bottom insert is another useful option. Trace the bottom of the box onto a piece of corrugated cardboard or sturdy chipboard, then trim it slightly so that it fits without bending. Wrap the insert in fabric, folding and gluing the excess material to the back. Place it inside the box to conceal raw edges and reinforce the base.
The insert can be removed for light cleaning or replaced if it becomes worn. It also provides a flatter surface for smaller contents and gives the interior the appearance of a fully lined storage bin without requiring complicated corner folds.
Add Handles, Labels, and Decorative Details

A plain fabric-covered box may be all you need but handles and labels can make it more practical. Before adding any feature, consider how the box will be used. Decorative details should make the organizer easier to identify or move without interfering with its ability to fit on the shelf.
For a simple pull handle, fold a length of sturdy cotton webbing, ribbon, or leather into a loop and attach both ends to the front of the box. Because cardboard can tear under pressure, reinforce the attachment points from the inside with extra cardboard. Bolts, washers, and capped fasteners are more durable than glue for boxes that will be pulled frequently.
Rope handles can be threaded through carefully cut holes, with large knots tied inside the box. Reinforce each hole first and make sure the rope does not fray the fabric. Cutout handholds are another option, but they are easiest to create before the fabric is applied. Once the box is wrapped, cut an X through the fabric at the opening, fold the triangular flaps inward, and glue them securely.
Metal label holders give the boxes the look of vintage office storage, while tied paper tags offer a simpler alternative. Labels are especially helpful when several matching boxes are used in a closet or craft room. Keep embellishments relatively flat if the boxes will sit closely together.
Ways to Use Fabric-Wrapped Boxes
Fabric-wrapped boxes can provide attractive storage in almost any room. In a living room, use them to contain remote controls, charging cables, magazines, games, or small toys. Choose fabric that relates to the room’s upholstery, curtains, or accent pillows so that the boxes feel like part of the decor.
In a home office, shallow boxes can organize notebooks, mailing supplies, printer paper, and technology accessories. Labeling them makes it easier to maintain the system once everything has been put away. Smaller covered boxes can corral pens, clips, receipts, and other items that tend to accumulate on a desk.
Closets benefit from deeper boxes that hold scarves, belts, gloves, small handbags, or out-of-season accessories. In a linen closet, fabric-covered boxes can separate washcloths, guest toiletries, cleaning cloths, and spare bathroom supplies. Avoid using cardboard organizers in areas that are routinely damp.
For a child’s room, choose cheerful, durable fabric and reinforce the box thoroughly. Wide, open bins make it easy for children to put away blocks, books, art supplies, and stuffed animals. Keep handles soft and decorations securely attached.
You do not need to use identical fabric on every box. A collection of coordinating solids and prints often looks more interesting than a perfectly matched set. Repeating one or two colors throughout the group is enough to create visual continuity.
Tips for a Professional-Looking Finish
Careful preparation matters more than expensive materials. Press the fabric before cutting, measure each surface accurately, and test the placement before applying adhesive. When using patterned fabric, decide which side of the box will face outward and center the most attractive portion of the design there.
Apply adhesive sparingly and evenly. Too much liquid medium can soak through lightweight fabric, leaving dark patches or a stiff texture. If you are uncertain how a product will behave, test it on a fabric scrap and a spare piece of cardboard first.
Place the final vertical seam at the back and keep the folded edge straight. Trim excess fabric gradually at the corners; you can always remove a little more, but cutting too closely may expose the cardboard. A wooden craft stick or bone folder can help press fabric into tight corners without leaving glue on your hands.
Allow the finished box to dry completely before filling it. Even if the fabric feels secure, adhesive trapped beneath it may need several hours to cure. Setting objects inside too soon can cause the cardboard to flex or the lining to shift.
Finally, be realistic about what a cardboard box can hold. These organizers are ideal for lightweight and moderately heavy household items, but they are not a substitute for wood, metal, or heavy-duty plastic containers when storing books, tools, or dense equipment.
Caring for Fabric-Wrapped Storage Boxes
Routine care will help the boxes remain attractive. Remove surface dust with a lint roller, soft clothes brush, or vacuum upholstery attachment used on low suction. Work gently around trim, handles, and labels.
If the fabric becomes marked, spot-clean it according to the textile’s care requirements. Use as little moisture as possible because water can soak through to the cardboard. Test any cleaning solution in an inconspicuous area first, particularly on dark or highly saturated fabrics.
Keep the boxes away from damp basements, humid bathrooms, and areas where spills are common. Prolonged direct sunlight may fade the fabric, especially if several boxes are displayed on a shelf near a window. Rotating them occasionally can help the color fade more evenly.
Inspect the folded edges and handles from time to time. If the fabric begins to lift, apply a small amount of fabric glue or hot glue beneath the loose section and press it back into place before the opening grows larger.
Customized Storage Without the Store-Bought Price
Fabric-wrapped boxes prove that practical organization does not need to be expensive or purely utilitarian. A box that might otherwise be discarded can become an attractive organizer designed specifically for your shelves, your belongings, and your decorating style.
Begin with one small, sturdy box while you become familiar with wrapping the corners and finishing the edges. Once you have practiced the technique, it is easy to create a coordinated collection for a closet, office, craft room, or living area.
Whether you use an understated neutral linen or a bold-patterned cotton, the result is storage that feels more thoughtful and personal. Instead of trying to find a ready-made container in exactly the right size and color, you can transform one you already have into something worth displaying.


Leave a Reply