

Fall crafts do not need to be elaborate to bring warmth and character to a room. A painted acorn garland turns one of the season’s smallest natural finds into a colorful decoration that can be draped across a mantel, hung from a shelf, or woven through a centerpiece. The finished garland feels playful and handmade, while the acorns’ natural caps and varied shapes keep it grounded in the season.
This is also an easy project to personalize. Earthy rust, mustard, and olive create a traditional autumn palette, while soft blue, sage, and cream give the garland a quieter, more contemporary look. A few metallic accents can dress it up, and leaving some acorns unpainted adds natural texture. Most of the project is relaxed, simple painting, although preparing and drilling natural acorns should be handled carefully by an adult.
What You’ll Need
- 30 to 40 acorns with caps.
- Baking sheet
- Parchment paper
- Acrylic craft paint in three to five coordinating colors
- Small craft paintbrushes
- Clear matte craft sealer
- Thin jute twine, sturdy cotton cord, or embroidery floss
- Small hand drill or pin vise with a fine bit
- Craft glue or a low-temperature hot-glue gun
- Scissors
- Empty egg carton or a piece of cardboard for drying
- Optional: metallic paint, small wooden beads, tassels, narrow ribbon, or painter’s tape
If natural acorns are not available, artificial craft acorns are a convenient substitute. They do not require cleaning or heat treatment, and many come with holes or hanging loops already attached.
Choose a Color Palette
Before painting, decide where the finished garland will be displayed. Pulling two or three colors from the surrounding room will help the craft feel like part of the décor rather than a separate seasonal addition. You can then add one or two distinctly autumnal shades for contrast.
Terracotta, mustard, cream, olive, and rust make a warm, classic combination. Sage, dusty blue, beige, and soft brown suit a quieter neutral room. For something bolder, try burgundy, muted orange, blush, and warm white. Black, cream, copper, and antique gold can give the project a more modern or dramatic finish.
Limit the palette to three to five colors and repeat each one throughout the garland. You can also leave a handful of acorns natural. Their brown shells and textured caps provide visual breathing room between the painted pieces and keep the arrangement from looking too uniform.
How to Make a Painted Acorn Garland
1. Collect and Inspect the Acorns

Gather more acorns than you think you will need so you can discard any that are damaged. Look for firm acorns without cracks, mold, soft spots, or tiny holes that may indicate insects. A mixture of shapes and sizes will make the finished garland feel organic, but acorns that are relatively similar in scale will be easier to space evenly.
Do not worry if some of the caps have fallen off. Collect the loose caps and match them to the acorns after everything has been cleaned and dried. Caps can be secured with glue before painting.
2. Clean and Heat-Treat Natural Acorns

Brush away loose dirt, then rinse the acorns briefly in cool water. Spread them on a towel and allow the surface moisture to dry. Avoid soaking them, since prolonged exposure to water can encourage cracking or mold.
Natural acorns may contain insects or larvae, so they should be heat-treated before they are brought into the house for a craft project. Heat the oven to 200°F. Line a baking sheet with parchment paper and arrange the acorns in a single layer. Bake them for 1½ to 2 hours, turning them about every 30 minutes so they dry evenly. Check them regularly and remove any that begin to split or darken excessively.
Keep the oven temperature low, never leave the acorns unattended, and allow them to cool completely before continuing. Because natural materials can scorch, an adult should supervise this entire step. If you prefer not to place acorns in the oven, use purchased wooden craft acorns instead.
3. Reattach Loose Caps

Once the acorns are cool and dry, match any loose caps with acorns that fit them. Place a small amount of craft glue or low-temperature hot glue inside each cap, then press it firmly onto the acorn. Wipe away visible excess glue and allow the caps to set completely.
Check all of the remaining caps as well. Even caps that initially feel secure can loosen as the acorns dry, so add a small dab of glue wherever needed. A well-secured cap is especially important because the hanging hole will pass through it.
4. Drill the Hanging Holes

Use a small hand drill or pin vise to make a hole through the center of each cap. Place the acorn on a protected work surface and hold it securely, keeping your fingers away from the path of the bit. Work slowly and apply gentle pressure so the cap does not crack. The hole only needs to be wide enough for the chosen twine or cord.
This step should always be completed by an adult. If you do not want to drill the acorns, cut short lengths of thin cord and form them into loops. After the acorns are painted and sealed, glue one loop behind each cap. The loops can then be threaded onto the main garland cord.
5. Paint the Acorns

Hold an acorn by its cap and brush a thin coat of acrylic paint over the exposed shell. Follow the natural curve of the acorn and avoid loading the brush with too much paint, which can create drips or obscure the surface texture. Set each acorn upright in an empty egg carton or press its pointed end gently into a piece of corrugated cardboard while it dries.
Apply a second thin coat if the first does not provide full coverage. The colors do not need to look perfectly identical. Slightly visible brushstrokes and subtle variations in coverage reinforce the handmade character of the garland. Leave the caps natural for contrast, or dry-brush a few with metallic paint for a small glint of color.
For added detail, use a fine brush to paint tiny dots, narrow stripes, simple leaf shapes, or color-blocked sections. You could also arrange the acorns in an ombré sequence that shifts gradually from light to dark. Keep decorative patterns simple so the collection remains cohesive when viewed as a garland.
6. Seal the Paint

Allow the paint to dry completely, then apply a light coat of clear matte craft sealer. A brush-on sealer gives you the most control, although a spray sealer can also be used outdoors or in a well-ventilated area according to the manufacturer’s directions.
The sealer protects the painted finish from small scratches during assembly and storage. Matte sealer preserves a soft, natural appearance, while satin sealer adds a subtle sheen. Let the acorns dry for the full amount of time recommended on the product label before stringing them.
7. Assemble the Garland
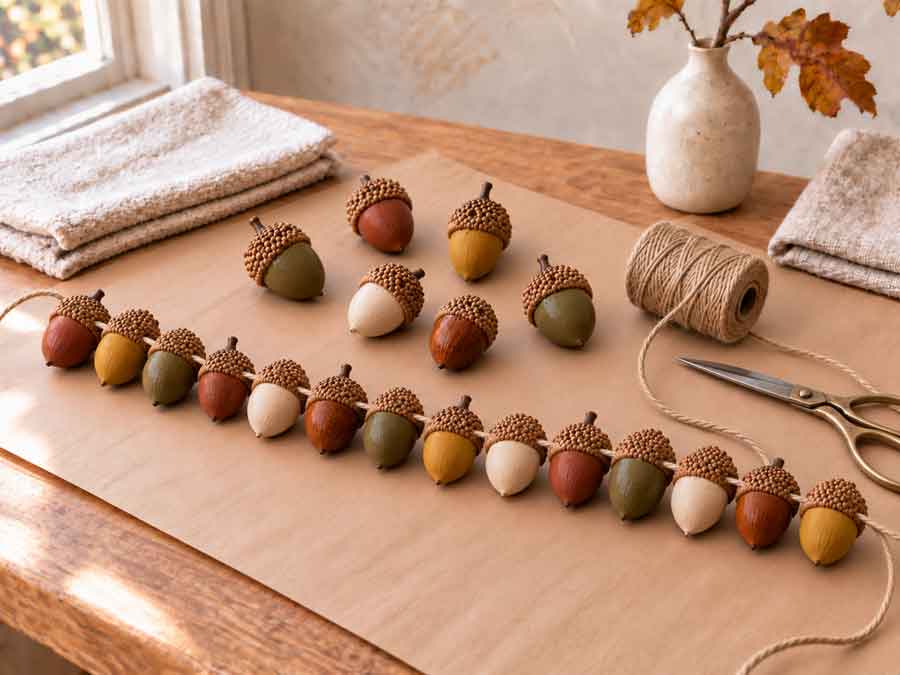
Decide how long you would like the finished garland to be, then cut the twine 16 to 24 inches longer than that measurement. The extra length will provide 8 to 12 inches at each end for hanging and adjustment. Wrap a small piece of clear tape around one end of the twine if it begins to fray while threading.
Thread the acorns onto the twine one at a time. For a full garland, position them close together so their caps nearly touch. For a lighter design, leave 1 to 2 inches of cord between them. Small knots placed beside each cap can keep widely spaced acorns from sliding.
Alternate colors and sizes as you work, but avoid making the sequence too rigid. Lay the garland flat after every few additions so you can see how the colors are distributed. If you are using wooden beads, add them between groups of acorns rather than between every piece so they function as occasional accents.
8. Finish the Ends

Once all the acorns are in place, tie a secure loop at each end of the twine. These loops make it easier to hang the garland from removable hooks, nails, or mantel clips. Trim any ragged ends, but leave enough cord to retie the loops if you want to adjust the length later.
For a more decorative finish, attach a small tassel, ribbon bow, or wooden bead to each end. Keep these additions in scale with the acorns so they do not visually overpower the garland. Lay the entire piece flat one final time, adjust the spacing, and touch up any paint that may have been scratched during assembly.
Ideas for Customizing the Garland
The basic technique leaves plenty of room for variations. Mix painted acorns with unpainted ones for a rustic look, or paint only the lower half of each shell for a color-dipped effect. A small amount of copper or gold paint on every fourth or fifth acorn adds warmth without making the entire project feel glittery.
For a family craft, let children paint the prepared acorns with washable or nontoxic craft paint while an adult handles the oven, drilling, hot glue, sealing, and assembly. Each person can choose one color or pattern, allowing the finished garland to include everyone’s work while still following a coordinated palette.
A shorter version can become a cabinet garland, a decorative tie around a basket, or a seasonal accent for a serving tray. Individual painted acorns also make charming gift toppers, place-card decorations, or small ornaments when fitted with their own hanging loops.
How to Display Your Painted Acorn Garland

Drape the finished garland loosely across a mantel, allowing a gentle curve rather than pulling the cord taut. On a bookshelf or open kitchen shelf, use removable hooks to anchor the ends and let the center dip slightly. It can also be hung across a mirror, arranged around a fall wreath, or layered with a simple strand of wooden beads.
For a table centerpiece, wind the garland among small pumpkins, dried leaves, candlesticks, or bud vases filled with autumn stems. Keep it clear of candle flames and hot serving pieces. The painted acorns also pair beautifully with warm white string lights, provided the lights remain cool and are rated for the intended location.
The garland is intended for indoor decorative use. Keep it away from fireplaces, open flames, moisture, pets, and very young children. Acorns and beads can present a choking hazard, and natural materials should not be placed where they might be chewed or swallowed.
Storing the Garland
At the end of the season, gently coil the garland rather than folding it. Place it in a shallow box with tissue paper between the layers to prevent the acorns from rubbing against one another. Store the box in a cool, dry closet rather than a damp basement, hot attic, or garage.
Before displaying the garland again, inspect the natural acorns for cracks, mold, or insect damage and discard any affected pieces. Reglue loose caps and touch up small chips with leftover paint. With careful preparation and dry storage, the garland can return as part of your fall decorating for several seasons.
A painted acorn garland celebrates the season without relying on a large or complicated project. The colors can be tailored to almost any room, while the irregular shapes and natural caps prevent the finished piece from feeling overly polished. Whether it is draped across a mantel, tucked into a centerpiece, or made with family members on a cool afternoon, it brings a warm handmade detail to fall decorating.
To pick up a draggable item, press the space bar. While dragging, use the arrow keys to move the item. Press space again to drop the item in its new position, or press escape to cancel.



Leave a Reply