
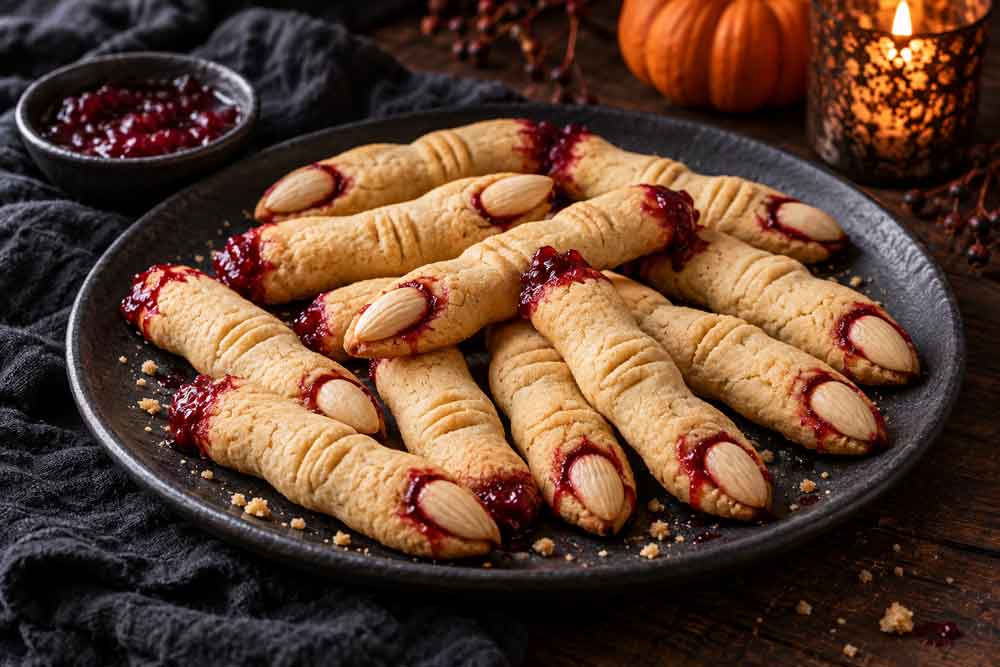
Buttery cookies take a gruesome turn with almond fingernails, crooked knuckles, and glossy red jam. These Bloody Finger Cookies look like something straight out of a Halloween horror movie, but underneath the creepy details is a tender, lightly sweet shortbread with vanilla and a hint of almond.
The decorations are simple enough to make without special equipment or elaborate piping skills. A few shallow knife marks create the knuckles, whole blanched almonds become fingernails, and small dabs of raspberry or strawberry jam supply the blood. Each finger can be a little different, which makes shaping them more forgiving and the finished platter more unsettling.
Serve them at a Halloween party, bring them to a spooky movie night, or make a batch for a dessert table that needs something a little more sinister than sprinkles.
What Makes These Cookies Work
Shortbread is a good foundation for shaped cookies because it contains no baking powder or baking soda to puff away the details. This dough combines butter, powdered sugar, and flour for a tender cookie that holds its shape when handled carefully and chilled thoroughly before baking.
The key is to mix the butter and sugar until smooth without beating them into a very fluffy mixture. Excess air can encourage the cookies to expand and soften the knuckle details. Starting with butter that is softened but still cool also makes the dough easier to shape.
The jam goes on after baking, giving you control over the finished appearance. It also adds a little tart fruit flavor that pairs nicely with the rich cookie and almond nail.
Ingredients You’ll Need
Unsalted butter supplies the rich flavor that makes these cookies worth eating after everyone has admired their creepy appearance. Let it soften enough to take an indentation when pressed, but avoid butter that looks shiny, greasy, or partially melted. Powdered sugar blends smoothly into the butter and gives the shortbread a fine, tender texture.
All-purpose flour provides structure, while a small amount of salt balances the sweetness. Vanilla extract rounds out the flavor, and a little almond extract echoes the almond fingernails. If you prefer a straightforward vanilla cookie, you can leave out the almond extract.
Whole blanched almonds make especially convincing fingernails because of their pale color and pointed shape. Smooth raspberry or strawberry jam creates the bloody details. Choose a thick jam that stays where you place it; if yours contains large fruit pieces, press a little through a fine-mesh sieve before decorating.
How to Make Bloody Finger Cookies
The process begins with a simple dough that should feel pliable and hold together when pressed. Once mixed, it is portioned into small pieces and rolled into slender fingers. Pinching the dough in a few places creates the knuckles, while shallow knife marks add definition without weakening the cookies.
After the almonds are pressed into place, the shaped fingers need a thorough chill. This firms the butter and helps preserve the narrow shapes in the oven. Once baked and completely cooled, the cookies are ready for their finishing touches: a little jam around the nails and a smear at the blunt ends.
Recipe: Bloody Finger Cookies
These buttery Halloween cookies have a tender shortbread texture, almond fingernails, and red jam details. Shape them slightly thinner than you want the finished cookies to be, since they will spread a little as they bake.
Makes about 30 cookies
Ingredients
- 1 cup (226 g) unsalted butter, softened but still cool
- ¾ cup (90 g) powdered sugar
- 1 teaspoon vanilla extract
- ¼ teaspoon almond extract, optional
- 2¼ cups (270 g) all-purpose flour, spooned and leveled
- ½ teaspoon fine salt
- About 30 whole blanched almonds
- ⅓ cup thick, smooth raspberry or strawberry jam
Instructions
- Line two baking sheets with parchment paper.
- Beat the butter and powdered sugar with an electric mixer on medium-low speed until smooth and combined, about 1–2 minutes. Scrape down the bowl as needed. Mix in the vanilla and almond extract, if using.
- Add the flour and salt. Mix on low speed just until the dough forms moist clumps. Press it together with your hands. If it is too soft to shape cleanly, cover and refrigerate for 15–20 minutes.
- Divide the dough into about 30 portions, roughly 19–20 g each. Roll each portion into a finger about 3½–4 inches long and slightly less than ½ inch thick. Keep the fingers slender and leave one end blunt.
- Gently pinch the dough on either side of the middle knuckle and just below the fingertip. Use a small knife to make two or three shallow creases across each knuckle area.
- Press an almond firmly into the fingertip, pointed end facing outward. Nestle the wider end into the dough so it sits in a defined nail bed.
- Arrange the cookies about 2 inches apart on the prepared baking sheets. Refrigerate for at least 45 minutes, until firm.
- Preheat the oven to 325°F while the cookies chill.
- Bake one sheet at a time on the center rack for 16–20 minutes, until the cookies look dry and set, with lightly golden bottoms and edges. Keep the remaining sheet refrigerated until ready to bake.
- Let the cookies cool on the baking sheet for 10 minutes, then carefully transfer them to a wire rack to cool completely.
- If an almond is loose, lift it off, place a small dab of jam in the indentation, and gently press it back into place. Use a toothpick or small spoon to add a little jam around the nail beds and at the blunt ends of the fingers.
- Let the decorated cookies stand for about 15 minutes before arranging them on a serving platter. The jam will remain slightly tacky.
Recipe Notes
For the most consistent results, weigh the flour and shape the fingers to a similar thickness. Cookies that are much thinner or shorter may finish baking sooner, so check them early.
If the dough cracks while rolling, press it together and let it soften briefly before continuing. If it feels greasy or begins losing its shape, refrigerate it before shaping more cookies. Avoid adding extra flour unless necessary, since too much can make the shortbread dry.
Tips for Realistic Finger Shapes
A slightly uneven shape makes these cookies more convincing, but exaggerated details tend to survive baking best. Leave a small, raised area for each knuckle and pinch the dough narrower on either side. Keep the creases shallow; deep cuts can turn into weak spots that break when the cookies are moved.
Make the fingers slender from the start. Thick dough logs may look appropriately finger-shaped before baking but can spread into broad cookies in the oven. A gentle bend or crooked fingertip adds character without making the cookies difficult to transfer.
The almond should sit partly embedded in the dough rather than balanced on top. Pressing it in creates a visible nail bed and helps it stay in place. A few almonds may still loosen as the cookies cool, but a small dab of jam underneath will secure them for serving.
Adding the Bloody Finishing Touches
Decorate only after the cookies have cooled completely. Warm cookies can loosen the jam and make it run farther than intended, while cooled shortbread gives you a firm surface for placing small details.
For a restrained look, trace a little jam around the base and sides of each almond. For a more gruesome platter, add a thicker smear at the blunt end of each finger and let it extend a short distance along the cookie. A toothpick is useful for narrow streaks, while the tip of a small spoon works well for larger dabs.
You do not need to cover every finger in the same amount of jam. A mix of lightly marked nails and bloodier ends gives the platter a more natural arrangement. Keep most of the cookie exposed so the knuckle details remain visible and guests can pick up the fingers without getting jam all over their hands.
Serving Ideas for a Creepy Cookie Platter
A dark platter makes the pale cookies and red jam stand out. Arrange the fingers at different angles, with a few overlapping once the jam has had time to settle. Parchment paper is useful underneath, especially if you plan to add extra jam around the severed ends.
These cookies work well alongside chocolate desserts, meringue ghosts, or a bowl of Halloween snack mix. Their buttery flavor offers a simple counterpoint to richer frosted treats, and the finger shape makes them easy to serve as individual portions.
For a horror movie night, place a small bowl of additional jam beside the cookies for dipping. If you are bringing them to a gathering, transport them in a single layer and add the final jam details after arrival for the neatest presentation.
Make-Ahead and Storage Tips
You can prepare the dough up to two days ahead and refrigerate it tightly wrapped. Let it soften just enough to roll without cracking, then shape and chill the cookies as directed. You can also shape the fingers in advance and refrigerate them, covered, overnight before baking.
For longer storage, freeze the shaped, undecorated fingers on a lined baking sheet until solid, then transfer them to a freezer-safe container. Bake from frozen, allowing a few additional minutes and watching for lightly golden edges. Use within two months for the best quality.
Store baked, undecorated cookies in an airtight container at room temperature for up to five days or freeze for up to two months. Add the jam close to serving for the best texture. Decorated cookies are best enjoyed the day they are assembled because moisture from the jam gradually softens the shortbread. Keep any leftovers in a single layer and follow the jam manufacturer’s storage guidance.
Frequently Asked Questions
Why did my finger cookies spread?
The dough may have been too warm, the butter may have been overly soft, or the flour may have been undermeasured. Beating too much air into the butter and sugar can also affect the shape. Chill the shaped cookies until firm and place them on cool baking sheets before baking.
If you are unsure how your dough will behave, bake one or two test fingers first while keeping the remaining cookies refrigerated. This gives you a chance to make the rest thinner or chill them longer.
Can I make these without almond extract?
Yes. The vanilla provides plenty of flavor on its own, so you can omit the almond extract without making any other changes. The whole almond fingernails will still add a little almond flavor and crunch.
What can I use instead of almond fingernails?
For an alternative to whole almonds, cut small, pointed nails from white chocolate or candy melts and attach them with a little melted chocolate after the cookies have cooled. Add the jam once the chocolate has set.
If you are avoiding nuts for an allergy, also omit the almond extract and check the labels of all substitute ingredients.
Can I use red decorating gel instead of jam?
Yes. Red decorating gel is easy to place precisely and gives the cookies a glossy finish. It will taste sweeter and less fruity than jam, so start with a small amount. Choose a gel intended for decorating baked goods rather than liquid food coloring, which can soak into the cookies.
Can I freeze the baked cookies?
Yes. Freeze the cookies before adding jam, separating layers with parchment and protecting the almond nails from pressure. Thaw them in their container, then decorate once they have reached room temperature.
Bloody Finger Cookies get their character from a few simple details: narrow shapes, crooked knuckles, pale almond nails, and just enough red jam to make everyone look twice. They are fun to arrange on a Halloween platter, and the buttery shortbread gives guests a familiar reason to reach for one—even if they hesitate for a moment first.



Leave a Reply