
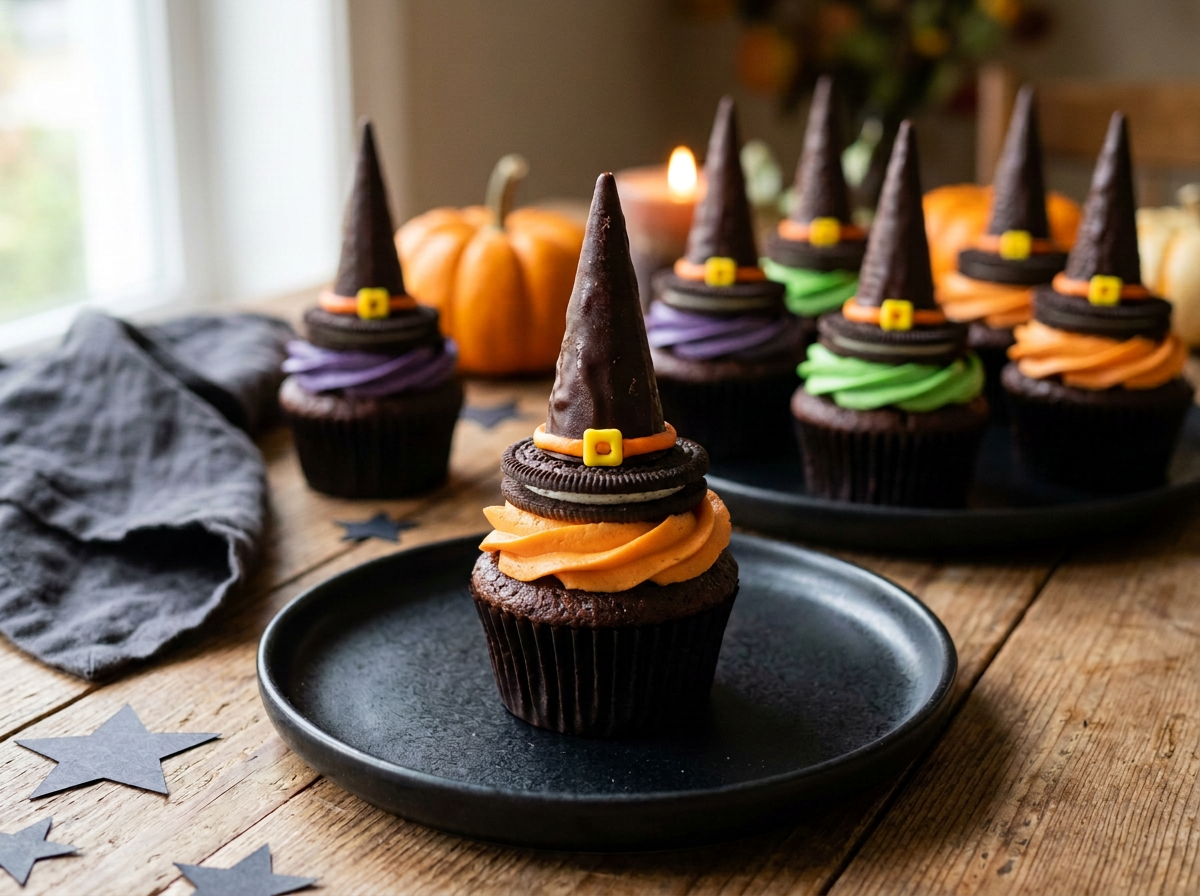
With pointed chocolate hats, wide cookie brims, and swirls of colorful buttercream, these Witch Hat Cupcakes are ready for a Halloween party. Beneath the decorations is a moist chocolate cupcake with a tender crumb and rich cocoa flavor. The crunchy toppers add another treat to enjoy, making each cupcake a little more fun to eat.
The hats come together with sugar cones, chocolate sandwich cookies, and melted chocolate. A simple frosting band gives them a finished look, while purple, green, or orange buttercream adds a bright splash of color underneath. You can bake the cupcakes from scratch using the recipe below or start with a boxed chocolate cake mix when you want to spend more time decorating.
Why You’ll Love These Witch Hat Cupcakes
These cupcakes have the height and personality to stand out on a Halloween dessert table, but the decorating process is approachable. The sugar cones provide the pointed shape, the cookies become the brims, and melted chocolate holds everything together. There’s no fondant to roll or complicated structure to build.
They’re also easy to customize. Deep purple frosting gives them a classic witchy look, while green or orange makes the display brighter and more playful. Keep the hats simple with a colored band or add a small buckle and a few star sprinkles. Even with slightly different decorations, the matching chocolate hats bring the whole tray together.
Preparing the components separately makes the project easier to fit into a busy party week. Bake the cupcakes ahead, assemble the hats once the chocolate has time to set, and bring everything together before serving.
The Ingredients That Make Them Work
The homemade cupcakes use cocoa powder for chocolate flavor and oil for a soft, moist crumb. Buttermilk adds richness and tenderness, while a small amount of hot water helps the cocoa blend smoothly into the batter. The batter will be fairly thin, which makes it easy to portion with a measuring cup or a scoop.
Vanilla buttercream provides a sweet, creamy contrast to the chocolate cake. It should be soft enough to pipe but firm enough to support the cookie topper. Gel food coloring works especially well here because it creates a strong color without adding much liquid.
For the decorations, use small, pointed sugar cones rather than flat-bottomed cake cones. Check their size against your cookies before beginning: the cookie needs to extend beyond the cone’s opening to create a visible brim. Mini sugar cones are ideal because they keep the hats proportional to the cupcakes and easier to handle.
Chocolate melting wafers make coating the cones straightforward. Choose wafers intended for dipping or candy making so the coating sets firm at room temperature. The same melted chocolate also attaches the cones to the cookies.
How to Make Witch Hat Cupcakes
Bake the Chocolate Cupcakes
Start with the cupcakes so they have plenty of time to cool while you make the decorations. Mix the dry ingredients in one bowl and the wet ingredients in another, then combine them and stir in the hot water. There’s no butter to cream, and the batter comes together with a whisk.
Fill the liners about halfway to two-thirds full, dividing the batter evenly among all 12. A relatively level cupcake top makes a good base for the frosting and hat. Let the cupcakes cool completely before decorating; even a slightly warm cake can soften the buttercream and cause the topper to lean.
Build the Chocolate Witch Hats
Coat each cone with a thin layer of melted chocolate, letting the excess drip off before placing it on a cookie. A spoon is helpful for covering any bare spots without repeatedly dipping the cone. The goal is an even shell that preserves the cone’s shape without becoming overly thick.
A ring of melted chocolate around the cone’s opening secures it to the cookie. Set the assembled hats on parchment and leave them undisturbed until firm. Once they’re set, pipe a narrow frosting band around the base of each cone. A small yellow buckle is an optional finishing touch.
Frost and Assemble
Pipe a broad, low swirl of buttercream onto each cupcake. A tall mound might look pretty on its own, but a lower swirl gives the wide cookie brim a steadier foundation. Leave some frosting visible around the edges so the color shows beneath the hat.
Add the hats close to serving time, pressing each cookie gently into the frosting. The cones and cookies will gradually soften after assembly, so keeping the decorations separate until the party helps preserve their crunch.
Recipe: Witch Hat Cupcakes
These moist chocolate cupcakes are topped with vanilla buttercream and crunchy chocolate witch hats made from mini sugar cones and sandwich cookies. Prepare the hats while the cupcakes cool, then assemble just before serving for the best texture.
Makes 12 cupcakes
Ingredients
For the Cupcakes:
- ¾ cup all-purpose flour (90 g)
- ⅓ cup unsweetened natural cocoa powder (28 g)
- ¾ cup granulated sugar (150 g)
- ½ teaspoon baking soda
- ¼ teaspoon baking powder
- ¼ teaspoon fine salt
- 1 large egg, at room temperature
- ½ cup buttermilk, at room temperature
- ¼ cup neutral oil, such as canola or vegetable oil
- 1 teaspoon vanilla extract
- ¼ cup hot water
For the Vanilla Buttercream:
- ¾ cup unsalted butter, softened (170 g)
- 3 cups powdered sugar (360 g)
- 1½ teaspoons vanilla extract
- ⅛ teaspoon fine salt
- 1–3 tablespoons heavy cream or milk, as needed
- Purple, green, or orange gel food coloring
- Yellow gel food coloring, optional, for buckles
For the Witch Hats:
- 12 mini pointed sugar cones, with openings approximately 1 inch wide
- 12 chocolate sandwich cookies, at least 1½ inches across
- 12 ounces chocolate melting wafers
- Small star sprinkles, optional
Instructions
- Preheat the oven to 350°F. Line a standard 12-cup muffin pan with paper cupcake liners.
- Whisk the flour, cocoa powder, sugar, baking soda, baking powder, and salt together in a large bowl.
- In a separate bowl, whisk the egg, buttermilk, oil, and vanilla until combined. Add to the dry ingredients and whisk just until smooth. Slowly whisk in the hot water. The batter will be thin.
- Divide the batter evenly among the liners, filling each about halfway to two-thirds full. Bake for 18–22 minutes, until a toothpick inserted into the center comes out clean or with a few moist crumbs.
- Let the cupcakes cool in the pan for 5 minutes, then transfer to a wire rack to cool completely.
- Line a tray with parchment paper and arrange the sandwich cookies on it. Melt the chocolate wafers according to the package instructions in a small, deep, microwave-safe bowl.
- Hold a cone by its open rim and dip or spoon chocolate over the outside, turning it to coat. Let the excess drip back into the bowl. Use a spoon to cover any bare spots.
- Dip the cone’s open rim into the melted chocolate and place it, point facing up, in the center of a cookie. Repeat with the remaining cones and cookies. Let stand until completely set, about 20–30 minutes or refrigerate for 5–10 minutes if needed.
- Beat the butter with an electric mixer on medium speed for 2–3 minutes, until smooth and creamy. Gradually add the powdered sugar on low speed. Add the vanilla, salt, and 1 tablespoon cream or milk. Beat on medium-high speed for 2–3 minutes, adding more cream or milk a teaspoon at a time as needed to make a fluffy buttercream that holds its shape.
- Reserve about ¼ cup buttercream for hatbands. If making buckles, reserve an additional tablespoon and tint it yellow. Tint the remaining frosting your desired color, using separate bowls if making multiple colors.
- Transfer the hatband frosting to a piping bag fitted with a small round tip or snip a small opening in the bag. Pipe a band around the base of each set cone. Add a small yellow buckle, if desired.
- Transfer the cupcake frosting to a piping bag fitted with a large star tip. Pipe a broad, low swirl onto each cooled cupcake.
- Shortly before serving, place one witch hat on each cupcake, gently pressing the cookie into the frosting. Add star sprinkles to the exposed buttercream, if desired.
Recipe Notes
- Cone and cookie sizes: Check the fit before coating the cones. The cookie should extend beyond the cone opening on every side. Larger cones will require more coating and may be too heavy for a standard cupcake.
- Boxed-mix shortcut: Substitute 12 cooled chocolate cupcakes made from your preferred mix. A standard box usually yields more than 12 cupcakes; the frosting and decorations listed here are intended for 12.
- Chocolate coating: Use melting wafers intended for dipping or candy making. Remelt briefly according to the package instructions if the coating thickens as you work.
- Decorating ahead: Store the cupcakes, buttercream, and hats separately, then assemble close to serving time to keep the toppers crisp.
Tips for Neat, Sturdy Witch Hats
The most useful preparation is checking your cone and cookie sizes. A cone that nearly covers the cookie won’t leave much of a brim, and an oversized cone can make the finished cupcake awkward to serve. Look for mini cones with openings around 1 inch wide and cookies at least 1½ inches across.
Give the chocolate coating enough time to set before adding the hatbands or moving the hats. If your kitchen is warm, a brief rest in the refrigerator can help firm the coating but avoid leaving the cones uncovered in the refrigerator for an extended period.
The buttercream’s consistency matters, too. If it looks loose or won’t hold its shape, beat in a little more powdered sugar. If it’s too stiff to pipe smoothly, add milk or cream a teaspoon at a time. You want a frosting that holds a defined swirl and supports the cookie without letting it slide.
Shortcuts and Decorating Variations
A boxed chocolate cake mix works well for this project. Prepare and bake it according to the package instructions, keeping in mind that a standard box usually makes more than 12 cupcakes. Either make additional hats and frosting or set aside the extra cupcakes for another use. Unfrosted bakery cupcakes are another convenient starting point.
For a coordinated platter, use one buttercream color beneath every hat. If you prefer a more colorful display, divide the frosting into separate bowls and tint them purple, green, and orange. A different color for each hatband adds detail without requiring more elaborate decorations.
You can also leave the hats completely chocolate and add a few star sprinkles to the exposed frosting. The cone-and-cookie shape already does most of the decorating work, so a simple finish still looks festive.
Serving Them at a Halloween Party
Arrange the cupcakes on a broad platter or sturdy cupcake stand, leaving space between the hat brims so guests can pick them up easily. A dark serving tray makes bright frosting colors stand out, while a few paper stars or small pumpkins around the platter complete the display without crowding the food.
These are easiest to eat when the hat is lifted off first, so offer small plates and napkins. Guests can enjoy the chocolate-covered cone and cookie separately, then eat the frosted cupcake. If you’re transporting them, pack the cupcakes and hats in separate containers and assemble them at your destination.
Make-Ahead and Storage
Bake the cupcakes up to two days ahead and keep them in an airtight container at room temperature once completely cool. For longer storage, freeze the unfrosted cupcakes for up to two months and thaw them, still covered, before decorating.
The buttercream can be refrigerated in an airtight container for up to one week. Let it soften at room temperature, then beat it again until fluffy before piping. Make the chocolate hats up to two days ahead and store them in a single layer in an airtight container in a cool, dry place.
For the best texture, add the hats shortly before serving. Store assembled leftovers in an airtight container at cool room temperature for up to two days, understanding that the cookies and cones will soften. In a warm kitchen, refrigerate the cupcakes and allow them to stand briefly at room temperature before eating.
These Witch Hat Cupcakes bring together a rich chocolate base, colorful frosting, and an edible decoration that’s almost as much fun to make as it is to eat. Whether you choose matching purple swirls or a mix of Halloween colors, the pointed hats give the finished tray plenty of personality—and a fitting place at your next Halloween celebration.


Leave a Reply