
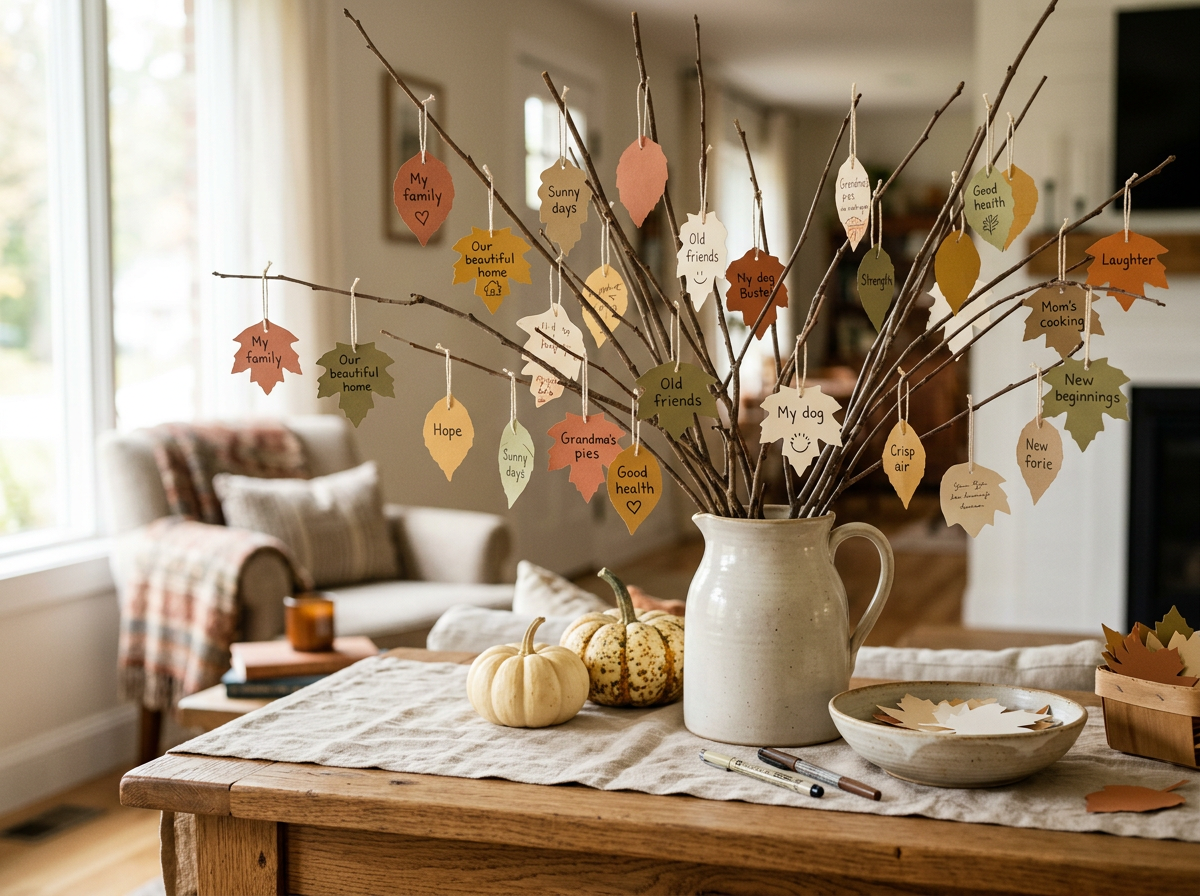
A few bare branches, a stack of colorful paper leaves, and a pen are all it takes to start a Thanksgiving decoration that becomes more personal as the month goes on. A thankful tree gives everyone a place to write down something they appreciate, then hang that thought where it can be enjoyed. At first, the branches may hold only a handful of leaves. By Thanksgiving, they can be filled with familiar names, happy memories, and small everyday pleasures.
This is an easy project to make with children, put together for a gathering, or enjoy on your own. Most of the supplies are ordinary craft materials, and the finished tree can suit almost any style of home. Set it on an entryway console or sideboard, keep extra leaves nearby, and let the handwritten messages bring it to life.
Choose a Look for Your Thankful Tree
Start with a small group of paper colors that works with your fall decorations. Rust, ochre, cream, and muted brown give the tree a traditional autumn feel without making it overly bright. For something quieter, try cream, kraft paper, and olive green. Using three or four colors helps the leaves look connected even when different people contribute their own handwriting and drawings.
The container makes a difference, too. A stoneware pitcher feels relaxed and homey, while a simple ceramic vase gives the branches a more sculptural appearance. A small planter can work especially well if it has a broad, stable base. You can usually use something you already own rather than buying a container just for this project.
Keep the branches natural and the leaf shapes fairly simple. A little variation looks lovely, but intricate cutouts and extra embellishments can make the project take much longer. The messages will become the most interesting part of the tree as it fills in, so give them plenty of room to stand out.
Materials You’ll Need
You do not need a large arrangement to make an inviting display. For a small console or sideboard, start with three to five slender branches and about 30 paper leaves. You can always cut more leaves later, and using fewer branches at the beginning makes it easier to find open places for hanging them.
Gather these supplies before you begin:
- Three to five clean, dry fallen branches with smaller offshoots
- A sturdy vase, pitcher, or planter with a broad base
- Clean pebbles or small stones to help anchor the branches
- Colored paper or lightweight cardstock
- Scrap cardboard for a reusable leaf template or printable template
- A pencil and scissors
- A hole punch
- Thin twine, cotton string, or narrow ribbon
- Pens or fine-tip markers that show clearly on your chosen paper
- A small bowl or tray for blank leaves
- Optional: a small instruction card
Lightweight cardstock is a good choice if you want to save the leaves from year to year. Ordinary colored paper also works, especially for a display that children will help create. Test your pen on a scrap first; dark brown or black is easy to read on light paper, while very dark leaves may need an opaque light-colored pen.
How to Make a Thankful Tree
Allow about an hour to arrange the branches and prepare the first batch of leaves, depending on how many you cut. The work is easy to divide: one person can trace leaves while another cuts them out or adds string. If children are helping, have an adult handle trimming branches and offer age-appropriate scissors for cutting the paper.
1. Arrange and Secure the Branches
Choose fallen branches that are dry, sturdy, and free of visible insects, mold, or crumbling bark. Brush away loose dirt outdoors and let any damp branches dry completely before bringing them into the display. Look for several small offshoots that can support lightweight paper leaves, and trim away sharp or awkward ends.
Arrange the branches in your container before adding the stones. Turn them until the smaller offshoots spread in different directions, leaving open space between them. A loose, slightly uneven shape feels natural and makes the leaves easier to see. If every branch overlaps in the middle, the messages will quickly become crowded.
Hold the arrangement in place and carefully add clean pebbles around the stems. The stones should help keep the branches upright, but the container itself also needs to be heavy and wide enough for the arrangement. Gently check for wobbling before continuing. If it feels top-heavy, shorten the branches or move them into a sturdier vessel.
2. Trace and Cut the Paper Leaves
Draw a simple leaf on scrap cardboard, about 3 to 4 inches long and wide enough through the middle for a short sentence. An oval shape with pointed ends is easy to trace and cut. If you prefer a more recognizable fall leaf, add a few broad lobes, keeping the outline uncomplicated.
Cut out the cardboard template and trace it onto the back of your colored paper. Turn the template as needed to fit more leaves on each sheet, leaving enough space to cut comfortably between them. One or two shapes are plenty; repeating them across several colors gives the tree variety without making it look busy.
Alternatively, you can download our free template. Print full-scale on colored cardstock and cut along the outline of each leaf.
Cut the leaves individually or in small stacks if your scissors can handle them neatly. For younger children, use larger, rounded leaves with fewer turns. Slightly uneven edges are part of a handmade project, so there is no need to make every leaf identical.
3. Add the Hanging Loops
Punch a hole near one end of each leaf, leaving about ¼ to ½ inch of paper between the hole and the edge so it does not tear easily. Avoid making a very narrow paper stem at this point; a broader end will hold the string more reliably.
Cut lengths of string about 6 to 8 inches long. Thread one piece through each hole, bring the ends together, and tie a knot to form a loop. The finished loop should slip easily over a small branch. Trim any long tails, then place the prepared leaves in a shallow bowl or tray.
It is worth adding the loops ahead of time, particularly if the tree will be used during a gathering. Guests can pick up a leaf, write their message, and hang it immediately. Make one sample leaf first to check that the loop fits your branches before preparing the rest.
4. Write and Hang the First Leaves
Write a few messages to get the tree started. These first leaves show people how the activity works and make the display feel welcoming before anyone else contributes. You might mention a helpful neighbor, a favorite family tradition, or a quiet morning spent with someone you love.
Write on the leaves while they are resting flat on the table, then hang them at different heights around the branches. Spread the first few out rather than clustering them together. Leave the branch tips and some lower offshoots available so children and arriving guests can find an easy place to add their own.
Set the remaining leaves and pens beside the tree. If its purpose is not immediately clear, add a small card that reads, “What are you thankful for? Write it on a leaf and add it to our tree.” A short invitation is enough to help people begin.
Give Everyone a Little Inspiration
A blank leaf can feel surprisingly difficult to fill in when someone thinks they need to come up with a profound answer. Help make the activity approachable by encouraging specific, ordinary things as well as the bigger ones. A friend who called at the right moment, a pet waiting at the door, or a favorite meal can all belong on the tree.
Children often come up with wonderfully direct answers. Let them include their favorite playground, a bedtime story, or the person who makes their pancakes. If they are too young to write, an adult can record their words exactly as they say them. Drawing a picture is another lovely way to participate.
If anyone needs a starting point, offer one of these prompts:
- Who made you smile recently?
- What is something you love about home?
- What small thing made today better?
- What are you thankful you learned this year?
- What is a memory you are glad you made?
- Who helped you when you needed it?
You can write a few prompts on a separate card beside the supplies or simply bring them into conversation. Leave room for different moods and answers. Someone may want to write a funny message, while another person may prefer a quiet acknowledgment of support during a difficult year. Both have a place on the branches.
Make It Part of Your Thanksgiving Traditions
If you set up the tree early in November, try adding leaves at a time when everyone is already together. After dinner or during a relaxed weekend breakfast, each person can write down something they appreciated that day or week. There is no need to maintain a perfect schedule. Even occasional additions will gradually fill the branches with a record of the month.
For Thanksgiving Day, place the tree where guests will notice it as they settle in. An entryway console or a sideboard near the living room works well because people can pause there without getting in the way of cooking or serving. Have the leaves threaded and ready before guests arrive, then mention the tree casually as you welcome them.
Later, you might invite people to read a few leaves aloud over dessert or leave the messages for everyone to discover on their own. Keep sharing optional, and let participants decide whether to add their names. The activity works best when it feels like an invitation people can enjoy at their own pace.
Style the Display Without Crowding It
The branches and paper leaves already create height, color, and movement, so the area around the tree needs very little decoration. A folded linen runner beneath the container, a few small pumpkins, and a bowl of blank leaves can be enough. Choose accents that repeat one or two of the paper colors to make the arrangement feel connected to the rest of the room.
Leave a clear patch of tabletop beside the supplies so people have a comfortable place to write. If the display is on a narrow console, use a small clipboard or firm writing pad that guests can pick up. Keep pens in a cup or shallow dish so they do not disappear beneath the leaves.
Position the tree away from open flames, door swings, and busy serving areas. Check that the branches do not extend into a walkway or sit at face height where people will lean over to write. If you want a little warm light nearby, a battery-operated candle offers a gentle glow without an exposed flame beside the paper.
As more leaves appear, redistribute them if one branch becomes crowded. A few open spaces help the individual shapes and messages remain visible. If the tree fills up completely, display additional leaves in a pretty bowl at its base or make a second small arrangement nearby.
Save the Leaves for Next Year
Once Thanksgiving is over, take a few minutes to gather the leaves before packing away the decorations. Add the year to the back of any undated leaves and ask family members whether they would like their names included. These small details make the messages easier to place when you revisit them later.
Store the leaves flat in a labeled envelope or keepsake box in a dry place. Arrange the hanging strings so they do not become tangled or remove them and add fresh loops next year. You do not need to keep the branches themselves unless you have a convenient place to store them; a new arrangement can hold the same treasured messages.
When you make the next thankful tree, bring out a few older leaves to read together. Some answers may make everyone laugh, while others will remind you of people, milestones, or everyday moments that might otherwise have faded from memory. Keep the new year’s leaves separate if you want to build a small collection over time.
A Tree That Becomes More Personal with Every Leaf
A thankful tree begins as a simple arrangement of branches, but the handwritten leaves give it a character that no store-bought decoration can supply. Different handwriting, children’s drawings, and unexpected little answers turn it into something specific to the people who gather around it.
Choose paper you like, use a container you already have, and make space for a few words of gratitude. Whether the tree fills slowly throughout November or comes together during one Thanksgiving afternoon, each leaf adds another small piece of your family’s story.



Leave a Reply