
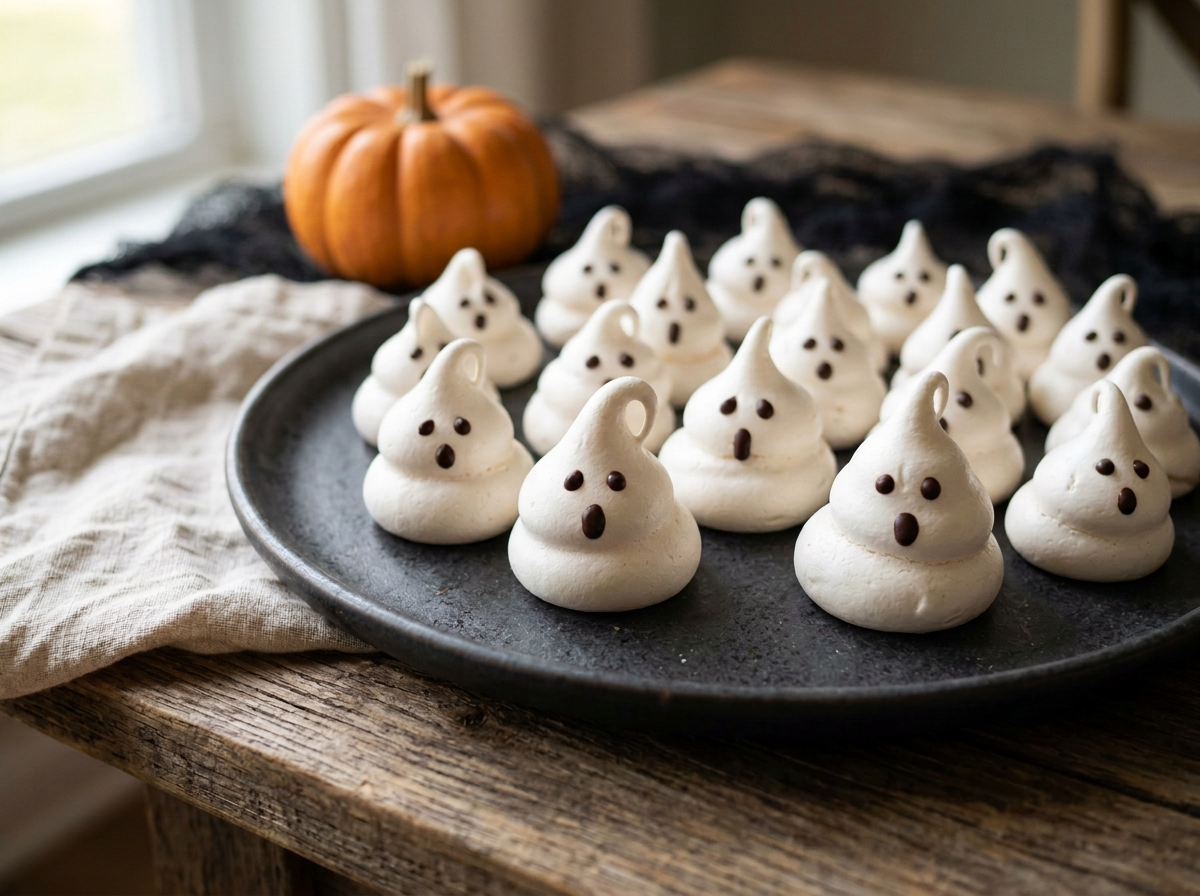
A tray of little white ghosts brings just the right amount of Halloween spirit to a dessert table. With swooping tops, rounded bodies, and tiny chocolate faces, these meringue ghosts look like they’re floating across the platter. Some seem surprised, others look a little mischievous, and a few will inevitably lean to one side—which only adds to their personality.
Beneath those playful expressions is a delicate cookie with a crisp, airy texture that practically melts in your mouth. The meringue itself needs only a handful of ingredients, and melted chocolate makes decorating simple. You don’t need elaborate piping skills or perfectly matching shapes to make a batch worth showing off.
Most of the time involved is hands-off while the ghosts bake and dry in a low oven. Make them ahead on a dry day, keep them in an airtight container, and they’ll be ready to join your Halloween celebration.
Why You’ll Love These Meringue Ghosts
These little ghosts offer a light, crisp bite alongside richer Halloween desserts. Serve them with fudgy brownies, chocolate cupcakes, or a spooky layer cake, and they add both texture and a bit of height to the display. Their bright white shapes also stand out beautifully against a dark platter or a scattering of orange and black decorations.
The decorating is especially forgiving. Two dots and a small oval are enough to create a recognizable ghost face, and slightly uneven expressions make the finished batch more charming. Once the meringues are baked and cooled, adding the faces is a fun finishing task to share with anyone who wants to help.
They’re also convenient for entertaining because you can finish them before party day. Their delicate texture does require protection from moisture, but with careful storage, they’re an easy dessert to have waiting in the wings.
Ingredients You’ll Need
Egg whites and sugar form the structure of these meringues. As the whites whip, they trap air; gradually added sugar helps turn that foam into a thick, glossy mixture that holds its shape. Large egg whites provide the right proportion for this recipe. Separate the eggs while cold, when the yolks are less likely to break, then let the whites stand at room temperature for about 30 minutes before whipping.
Superfine sugar is particularly useful because its small crystals dissolve readily. Regular granulated sugar works too, but it may need a little more mixing time. The important part is adding it slowly and checking the finished meringue for grittiness before piping.
Cream of tartar helps stabilize the whipped whites, while a small amount of vanilla adds flavor. Use clear vanilla if keeping the ghosts as white as possible is a priority; regular vanilla works well but may give the mixture a faint ivory tint. A pinch of salt rounds out the sweetness.
For the faces, semisweet or dark chocolate gives a clear contrast against the white meringue. A finely chopped baking bar melts smoothly and is easy to pipe into small eyes and mouths.
Equipment and Setup
Start with a clean, completely dry glass or metal mixing bowl and clean beaters or a whisk attachment. Even a little grease or egg yolk can interfere with the whites’ ability to whip properly. Separating each egg into a small bowl before adding its white to the mixing bowl helps prevent one broken yolk from affecting the entire batch.
A piping bag fitted with a large round tip creates the ghosts’ smooth bodies. An opening about ½ inch wide works well. If you don’t have a suitable tip, snip a similar-size opening in the end of a sturdy disposable piping bag. For the faces, use a separate small piping bag, a parchment cone, or a toothpick.
Line your baking sheets with parchment rather than greasing them. If the parchment curls or shifts, a tiny dab of meringue beneath each corner will hold it in place. Plan to leave the oven available for several hours, including the drying period after baking.
Recipe: Meringue Ghosts with Chocolate Faces
These crisp vanilla meringues are piped into small ghost shapes, dried slowly in the oven, and finished with melted chocolate eyes and mouths. Keep the ghosts similar in size so they bake evenly but let their pointed tops curl and lean for a little personality.
Makes about 30 ghosts
Ingredients
- 4 large egg whites, at room temperature, about 120 grams
- ½ teaspoon cream of tartar
- ⅛ teaspoon fine salt
- 1 cup superfine sugar or granulated sugar, 200 grams
- ½ teaspoon vanilla extract, clear if desired
- 2 ounces semisweet or dark chocolate, finely chopped
Instructions
- Preheat the oven to 200°F. Position racks in the upper and lower thirds of the oven. Line two baking sheets with parchment paper.
- Place the egg whites in a clean, dry mixing bowl. Beat on medium speed until foamy, then add the cream of tartar and salt. Continue beating until soft peaks form.
- Increase the speed to medium-high. Add the sugar approximately 1 tablespoon at a time, allowing about 15 seconds between additions. Once all the sugar has been added, continue beating until the meringue is thick and glossy and holds stiff, upright peaks. This may take another 3–5 minutes, depending on your mixer.
- Rub a small amount of meringue between two clean fingers. It should feel smooth, with no obvious sugar crystals. If it feels gritty, beat for another minute and check again. Add the vanilla and beat briefly to incorporate.
- Transfer the meringue to a piping bag fitted with a large round tip. Pipe ghosts about 1½ inches wide at the base and 2 inches tall, leaving approximately 1 inch between them. Hold the bag upright, squeeze to form a rounded base, then gradually lift while easing the pressure. Stop squeezing and lift away to create a pointed top.
- Bake for 1½–2 hours, until the ghosts feel dry on the outside and a test meringue lifts cleanly from the parchment once allowed to cool briefly. If the base sticks or the center of the test meringue is still tacky, continue baking in 15-minute increments. If needed for even drying, gently switch the baking sheets between racks after the first hour.
- Turn off the oven and leave the ghosts inside with the door closed for about 2 hours, until the oven and meringues have cooled completely.
- Place the chopped chocolate in a microwave-safe bowl. Microwave in 20-second intervals, stirring after each, until melted and smooth. Let it cool slightly so it remains fluid but is no longer hot.
- Transfer the chocolate to a small piping bag and snip off a tiny corner. Pipe two small eyes and an oval mouth onto each cooled ghost. Alternatively, use a toothpick dipped in chocolate to draw the faces.
- Let the ghosts stand until the chocolate is firm, about 20–30 minutes in a cool room. Serve or transfer promptly to an airtight container.
Tips for Crisp, Airy Meringue Ghosts
The most important steps happen before the ghosts reach the oven. Keep the bowl and beaters free of grease, separate the eggs carefully, and give the sugar time to dissolve. Adding all the sugar at once can weigh down the foam, while undissolved crystals can contribute to a grainy texture or beads of syrup on the finished meringues.
Watch the texture as you whip. The finished mixture should look glossy and hold a defined peak when you lift the whisk. If it slumps, it needs more beating before it will support an upright ghost shape. Once the meringue reaches stiff peaks and feels smooth, stop mixing and begin piping.
Low heat gives the ghosts time to dry without taking on much color. If they begin turning beige, your oven may be running hot; an oven thermometer can help you check the actual temperature. Small surface cracks are mainly cosmetic and can give the ghosts a little extra character, but gentle heat and gradual cooling help limit them.
Humidity is another important factor. Meringue readily absorbs moisture from the air, so a rainy or very humid day can make it difficult to achieve and maintain a crisp texture. Let the ghosts cool fully, then move them into an airtight container instead of leaving them exposed on the counter.
How to Pipe Ghost Shapes and Chocolate Faces
For a nicely rounded ghost, hold the piping bag straight above the baking sheet with the tip close to the parchment. Apply steady pressure until you have a broad base, then lift slowly while continuing to squeeze more gently. Release the pressure before pulling the bag away so the top ends in a little point.
You can also create a gently tiered shape by pausing briefly as you lift, forming two or three connected rounds. Keep the rounds touching so the ghost has a solid body. Whichever style you choose, aim for consistent height and width throughout the batch rather than trying to make every curve identical.
The chocolate faces are easiest to control when the chocolate has cooled slightly after melting. It should flow smoothly without running across the surface. Practice a few dots and ovals on parchment first, then decorate the ghosts. Make the opening in your piping bag very small; you can always enlarge it if necessary.
A toothpick works particularly well for tiny eyes. Dip the tip into the chocolate and touch it lightly to the meringue, then use a little more chocolate to draw an open mouth. Handle each ghost gently near its base, where it is strongest.
Serving Ideas for a Halloween Dessert Table
Arrange these ghosts on a black or charcoal platter to show off their shapes and expressions. A few scattered chocolate pieces or wrapped candies around the platter can add color without crowding the display. For a softer look, use a simple white cake stand with a dark napkin beneath it.
Their airy texture makes them a welcome addition to a dessert spread with brownies, cookies, and cupcakes. You can also place a few around the base of a Halloween cake or stand one on each serving plate as a small finishing touch.
If you use the ghosts as cake or cupcake toppers, add them shortly before serving. Frosting, pudding, whipped cream, and other moist foods will gradually soften the meringue. The same applies to hot drinks: a ghost perched beside a mug of cocoa makes a charming presentation but keep it out of the steam until you’re ready to enjoy it.
For favors, package the ghosts only after the chocolate has set completely. Small food-safe bags or rigid treat boxes work well, though boxes give their delicate tops a little more protection. Keep the packages sealed and store them somewhere cool and dry.
Make-Ahead and Storage
For the best texture, make these ghosts 1–2 days before serving. Once they have cooled and their chocolate faces have set, store them in an airtight container at cool room temperature. In dry conditions, they may keep well for up to a week, but humidity and the quality of the container’s seal will affect how long they stay crisp.
A single layer offers the best protection for the pointed tops. If you need to stack them, use a deep container, place parchment between the layers, and arrange them carefully so the upper layer doesn’t press against the ghosts underneath.
Avoid refrigerating the finished meringues, since moisture and condensation can make them sticky. Keep the container away from the stove, dishwasher, and other sources of heat or steam.
If undecorated meringues soften slightly, you can try drying them again in a 200°F oven for 10–15 minutes, then letting them cool in the switched-off oven. Do this before adding the chocolate faces, which would melt during reheating.
Meringue ghosts turn a few basic ingredients into a playful Halloween dessert with plenty of character. Their crisp shells, delicate vanilla flavor, and little chocolate expressions make them just as enjoyable to eat as they are to arrange on a platter. Let a few tops curl, give each face a slightly different look, and enjoy a whole gathering of sweet little ghosts.



Leave a Reply