
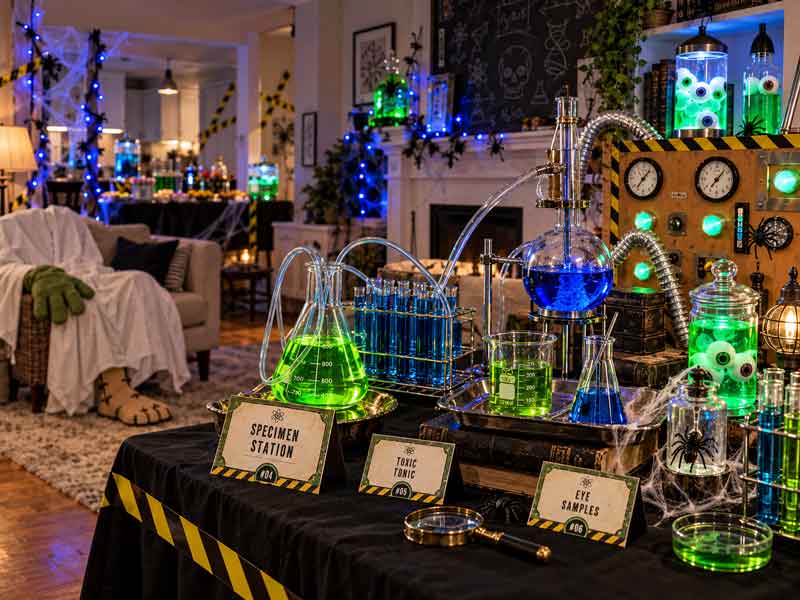
Somewhere behind the caution tape, a mysterious experiment is underway. Green specimens glow on a shelf, unfamiliar equations cover the wall, and a collection of miniature sandwiches awaits its next round of monster assembly. Welcome to the Mad Scientist’s Laboratory, a Halloween party that comes with a healthy dose of curiosity and a little creative chaos.
The third theme in our Halloween Party Series follows the eerie atmosphere of Haunted Mansion and the candlelit drama of The Raven’s Feast with something brighter and more hands-on. This laboratory is full of strange discoveries, but its mysteries are playful enough for children to investigate. There are no jump scares or gruesome props, just silly specimens, pretend machinery, colorful food, and a guessing game that puts everyone’s powers of observation to work.
This guide brings the whole party together, from the front-door welcome to the final specimen reveal. You’ll find a complete menu with recipes, decorating instructions for three areas of your home, a signature DIY project, an activity, free printables, and a prep schedule. Use the entire plan or choose the elements that suit your space and guest list.
Halloween Party at a Glance
- The Mood: Chaotic, experimental, and playful, with glowing specimens, mysterious controls, and unfinished research.
- Colors: Black, white, acid green, electric blue, and touches of metallic silver. Black-and-yellow caution accents mark the entrance.
- Scare Factor: No gore or jump scares. This is an interactive theme for kids, with curious discoveries and comical creatures.
- The Menu: Familiar savory bites, miniature sandwiches, colorful produce, and small sweets, presented as edible experiments.
- Activity: Identify the Specimen, a touch-and-guess game using kitchen and pantry ingredients.
- DIY: Illuminated Specimen Jars.
- Printables: Welcome sign, laboratory access badges, warning signs, food labels, specimen jar labels, and game cards.
Setting the Scene
The most convincing laboratory looks as though someone has been busy working in it. A perfectly symmetrical display is less useful here than a few grouped experiments, a diagram left unfinished, and a warning sign attached at a slightly crooked angle. Concentrate your decorations in three places: the entrance, the main party space, and the specimen station. These give guests a clear path through the experience without requiring you to decorate every room.
The Entryway: Authorized Personnel Only

Begin with a large “Laboratory: Authorized Personnel Only” sign on the front door. Frame it with black-and-yellow caution tape, fastening the tape around the doorway rather than across the walking path. The entrance directs guests toward a basket of numbered access badges.
Give each visitor a badge with room for a name and scientific specialty. “Creature Specialist,” “Junior Chemist,” and “Specimen Investigator” are good choices, or let children invent their own. Clip the badges to clothing or place them in adhesive badge holders so guests can start playing their roles as soon as they arrive.
Add green or blue battery-operated lights around the sign or beside the door. Choose a steady glow or a gentle flicker that resembles malfunctioning machinery. To suggest a larger laboratory beyond the entrance, cut pipe shapes from black poster board and connect them along the wall with removable adhesive suitable for the surface. Add circular silver-paper gauges, painted cardboard joints, and drawn coils. Several connected shapes will look more intentional than a scattering of unrelated science decorations.
Party Space / Living Room: Experiments in Progress

Use the buffet table as the main laboratory workbench. White coverings suggest a research surface, black makes the bright food and labels stand out, and metallic silver adds the look of machinery. A white covering with a few black paper strips forming a grid is an inexpensive way to echo a technical drawing.
Group decorative beakers, flasks, or clear bottles filled with lightly colored water at the back of the table. Use different heights, leaving the serving area open in front. Keep decorative liquids clearly separate from drinks; all food and beverages should go into clean containers intended for food use.
Display the illuminated specimen jars on a shelf or side table, where their glow can become part of the room’s lighting. Nearby, prop up a chalkboard or poster covered with imaginary formulas, a diagram of a many-eyed creature, and notes such as “Trial 07: Unexpected Results.” These details reward a closer look and give the room a story.
For the control panels, cover flat cardboard with silver paper or paint. Glue on bottle caps for dials, draw gauges, and add large cardboard switches. Label one section “Containment,” another “Power Supply,” and a particularly dramatic button “Do Not Press.” A pretend panel near the specimen shelf connects the displays visually.
Finally, conceal a partly assembled creature beneath a sheet on a chair or low table. Use pillows and rolled clothing for the body, with an oversized cardboard foot or a soft green mitten peeking out. Keep the shape amusing and leave it motionless. It should look like a ridiculous project awaiting completion.
The Specimen Station: Hands-On Research

Give the guessing game a separate table, ideally on an easy-to-clean floor. Cover it with a washable cloth or disposable covering and place each specimen container in a shallow tray. The trays keep the numbered stations organized and contain the inevitable drips.
Arrange the stations in a clear sequence so children can move along without reaching across one another. At one end, set out pencils, answer cards, goggles, and optional non-latex gloves. At the other, leave a place for completed cards. Simple goggles are costume accessories for this activity, but they help young guests feel like researchers.
Keep replacement specimen portions out of sight until needed. An adult can replenish the containers, help children match station numbers to their cards, and collect used portions. Plan a handwashing break before the game and another afterward.
The Mad Scientist’s Menu
- Molecule Skewers with Cheese, Fruit, and Vegetables
- Radioactive Spinach Dip with Tortilla Chips
- Build-a-Monster Slider Laboratory
- Spiral Pasta Brain Salad
- Petri Dish Vegetable Cups with Dip
- Radioactive Rice Treats
- Test-Tube Pudding
- Fizzy Fruit Punch
- Optional Adult “Experimental Compound” Cocktail
A laboratory theme makes everyday party food feel inventive. Cheese and fruit become molecular models, green spinach dip turns radioactive, and small burgers become a monster-building experiment. The flavors remain familiar, and the portions leave room for guests to try several things.
The recipes below are planned around approximately 12 guests sampling several dishes. Each recipe lists its own yield so you can adjust the menu easily.
Recipe: Molecule Skewers with Cheese, Fruit, and Vegetables

Color does most of the decorating for these little molecular models. Make one tray of savory skewers and another of fruit, then arrange them in loose clusters rather than straight rows. Short bamboo paddle picks work well for older children; for younger guests, serve the same ingredients in small “molecule sample” cups.
Makes 24 short skewers, 12 savory and 12 fruit
Ingredients
For the savory skewers:
- 6 ounces mild cheddar or Monterey Jack, cut into 12 bite-size cubes
- 12 cucumber half-moons, about ½ inch thick
- 12 small red bell pepper squares
For the fruit skewers:
- 12 small strawberry halves
- 12 pineapple chunks
- 12 seedless green grape halves, cut lengthwise
For serving:
- 24 short, blunt-ended food picks, or small serving cups
Instructions
- Thread one cheese cube, cucumber piece, and bell pepper square onto each of 12 picks.
- Thread a strawberry half, pineapple chunk, and grape half onto each remaining pick.
- Arrange the two varieties separately on trays, cover, and refrigerate until serving.
Make ahead: Prepare up to 4 hours ahead and keep chilled. Cut pieces to suit the ages of your guests; use cups instead of picks when appropriate.
Recipe: Radioactive Spinach Dip with Tortilla Chips

This cool, creamy dip gets its green color from spinach, with mild seasonings that make it easy to enjoy. A quick pulse in the food processor creates a smoother texture and distributes the green throughout. Set it in a bowl on a black tray and surround it with chips for a simple, striking centerpiece.
Makes 12 appetizer portions
Ingredients
- 10 ounces frozen chopped spinach, thawed
- 1 cup sour cream
- ½ cup mayonnaise
- ½ cup finely grated Parmesan
- 1 tablespoon lemon juice
- ½ teaspoon onion powder
- ¼ teaspoon garlic powder
- ¼ teaspoon fine salt, plus more to taste
- ⅛ teaspoon black pepper
- 1 bag tortilla chips, about 10–12 ounces
Instructions
- Squeeze the thawed spinach very dry in a clean kitchen towel.
- Combine spinach, sour cream, mayonnaise, Parmesan, lemon juice, seasonings, salt, and pepper in a food processor. Pulse until the spinach is finely distributed, scraping down the bowl as needed.
- Taste and adjust the seasoning. Cover and refrigerate for at least 1 hour.
- Spoon into a serving bowl and serve with tortilla chips.
Make ahead: Refrigerate the dip up to 1 day ahead. Stir before serving and put out small bowls as needed.
Recipe: Build-a-Monster Slider Laboratory

The sliders are the main course and part of the entertainment. Place the cooked patties beside split buns and labeled bowls of toppings, then let guests build their own creatures. Cheese triangles make teeth, lettuce becomes unruly hair, and a dab of ketchup supplies a silly expression.
Makes 12 sliders
Ingredients
- 1½ pounds ground beef
- ¾ teaspoon kosher salt
- ¼ teaspoon black pepper
- 1 teaspoon neutral oil, if needed for the skillet
- 12 slider buns, split
- 6 slices cheddar or American cheese, halved
- 12 small pieces lettuce
- 12 sandwich-sliced pickles
- ½ cup ketchup
- ¼ cup mayonnaise
- ¼ cup yellow mustard, optional
Instructions
- Divide the beef into 12 equal portions. Shape into thin patties slightly wider than the buns and season both sides with salt and pepper.
- Heat a large skillet over medium-high heat, adding oil if needed. Cook patties in batches for about 3–4 minutes per side, until a food thermometer reads 160°F in the center.
- Add cheese during the final minute of cooking if you prefer melted cheese; otherwise set it out with the toppings.
- Arrange patties, buns, lettuce, pickles, and sauces at the slider station. Have guests assemble their monsters.
Serving idea: Cut the cheese edges into irregular teeth before setting it out. Draw faces with sauces rather than adding small nonfood decorations.
Make ahead: Shape patties a day ahead and refrigerate, covered. Cook shortly before serving and replenish the buffet in small batches.
Recipe: Spiral Pasta Brain Salad

The curls of rotini give this mild pasta salad its laboratory identity without elaborate shaping. Cheese, sweet peas, and small pieces of bell pepper add color, while a creamy lemon dressing ties everything together. Serve in clear cups for individual brain samples or a wide bowl with a large specimen label.
Makes about 8 cups, or 12 small side servings
Ingredients
- 12 ounces rotini
- 1 cup frozen peas
- 1 cup finely diced red bell pepper
- 1 cup peeled, diced cucumber
- 4 ounces mild cheddar, cut into small cubes
- ½ cup mayonnaise
- ¼ cup plain Greek yogurt
- 1 tablespoon lemon juice
- 1 teaspoon Dijon mustard
- ½ teaspoon fine salt, plus salt for pasta water
- ¼ teaspoon garlic powder
- ⅛ teaspoon black pepper
Instructions
- Cook rotini in salted water according to package directions. Add peas for the final minute. Drain, rinse briefly under cool water, and drain well.
- Whisk mayonnaise, yogurt, lemon juice, mustard, salt, garlic powder, and pepper in a large bowl.
- Add pasta, peas, bell pepper, cucumber, and cheese. Toss gently to coat.
- Cover and refrigerate for at least 1 hour. Stir and adjust seasoning before serving.
Make ahead: Prepare up to 1 day ahead. If it needs loosening after chilling, stir in a spoonful of milk or water.
Recipe: Petri Dish Vegetable Cups with Dip

These colorful samples give the buffet a fresh, crunchy option. Shallow clear cups with lids resemble petri dishes while remaining easy to carry and eat from. Fill them with familiar vegetables and a homemade ranch-style dip, arranging the pieces as though each cup contains a carefully collected specimen.
Makes 12 small cups
Ingredients
- ¾ cup plain Greek yogurt
- ¼ cup mayonnaise
- 1 tablespoon lemon juice
- ½ teaspoon dried dill
- ½ teaspoon onion powder
- ¼ teaspoon garlic powder
- ¼ teaspoon fine salt
- 1–2 tablespoons milk, as needed
- 2 medium carrots, peeled and cut into thin sticks
- 1 English cucumber, cut into thin sticks or half-moons
- 1 large yellow bell pepper, cut into short strips
- 12 shallow food-safe cups, about 4 ounces each
Instructions
- Whisk yogurt, mayonnaise, lemon juice, dill, onion powder, garlic powder, and salt. Add enough milk to make a thick dipping consistency.
- Divide the dip among the cups, using about 1 tablespoon per cup.
- Divide the vegetables evenly among the cups. Cover and refrigerate until serving.
Make ahead: Mix the dip a day ahead and assemble cups up to 4 hours before serving. For very young guests, substitute soft-cooked vegetable pieces as appropriate.
Recipe: Radioactive Rice Treats

A bright green drizzle transforms these familiar squares into suspiciously delicious experimental compounds. Keep the decoration irregular, with splashes and zigzags that look as though an enthusiastic scientist has been at work. A few blue sprinkles finish the effect.
Makes 24 small squares
Ingredients
- 4 tablespoons unsalted butter
- 10 ounces mini marshmallows
- ¼ teaspoon fine salt
- 1 teaspoon vanilla extract
- 6 cups crispy rice cereal
- ¾ cup powdered sugar
- 2–3 teaspoons milk, plus more as needed
- Green gel food coloring
- 2 tablespoons blue sprinkles
Instructions
- Line a 9-by-13-inch pan with parchment and lightly grease it.
- Melt butter in a large saucepan over low heat. Add marshmallows and salt, stirring until melted. Remove from heat and stir in vanilla.
- Fold in cereal. Transfer to the pan and gently press into an even layer with a greased spatula.
- Let set for about 1 hour, then cut into 24 squares.
- Stir powdered sugar with enough milk to form a thick drizzle. Tint green, drizzle over the squares, and add sprinkles. Let the icing set before arranging.
Make ahead: Store in an airtight container at room temperature for up to 2 days. Avoid pressing the cereal mixture firmly, which makes the treats dense.
Recipe: Test-Tube Pudding

Smooth chocolate pudding becomes a collection of sweet laboratory samples when portioned into clear tubes or miniature cups. Cookie crumbs resemble soil specimens, and green sprinkles bring in the party palette. Use wide food-safe plastic tubes that a small spoon can reach into; if they are narrow, choose dessert cups instead.
Makes about 3 cups, 12 ¼ cup portions
Ingredients
- ½ cup granulated sugar
- ¼ cup unsweetened cocoa powder
- 3 tablespoons cornstarch
- ¼ teaspoon fine salt
- 3 cups whole milk
- 2 tablespoons unsalted butter
- 1 teaspoon vanilla extract
- ½ cup finely crushed chocolate sandwich cookies
- 1 tablespoon green sprinkles, optional
Instructions
- Whisk sugar, cocoa, cornstarch, and salt in a medium saucepan. Gradually whisk in milk until smooth.
- Cook over medium heat, stirring constantly, until the pudding thickens and begins bubbling. Reduce heat and cook for 1 minute, stirring.
- Remove from heat and stir in butter and vanilla. Transfer to a bowl and cover the surface directly with food wrap. Refrigerate for at least 2 hours, until cold.
- Stir the chilled pudding until smooth and spoon or pipe into food-safe tubes or cups. Top with cookie crumbs and optional sprinkles.
Make ahead: Make pudding up to 2 days ahead. Fill containers a day ahead, keeping them upright and covered in the refrigerator. Add crumbs shortly before serving.
Recipe: Fizzy Fruit Punch

The laboratory needs a colorful beverage, and this lightly fizzy green punch is easy to mix in minutes. White grape juice keeps the flavor gentle, pineapple adds fruitiness, and a little lime supplies brightness. The green tint is optional, but it makes clear cups look like fresh experimental batches.
Makes: 12 servings of approximately ¾ cup
Ingredients
- 4 cups chilled white grape juice
- 2 cups chilled pineapple juice
- ¼ cup fresh lime juice
- 3 cups chilled lemon-lime soda or sparkling water
- 1–2 drops green food coloring, optional
- Ice, for serving
Instructions
- Combine white grape juice, pineapple juice, and lime juice in a pitcher or punch bowl. Add food coloring, if using.
- Just before serving, gently stir in soda or sparkling water.
- Pour into cups over ice.
Make ahead: Mix the juices up to 1 day ahead and refrigerate. Add the fizzy ingredient at serving time. Sparkling water makes a less sweet version.
Recipe: Optional Adult “Experimental Compound” Cocktail

For adults, a blue citrus cocktail carries the laboratory colors into a separate drinks station. Make it to order so the soda stays lively, and use different glassware from the children’s punch. A clearly marked adult beverage area keeps the two experiments easy to distinguish.
Makes 1 cocktail
Ingredients
- 1 ounce vodka
- ½ ounce blue curaçao
- 1 ounce pineapple juice
- ½ ounce fresh lemon juice
- 2 ounces chilled club soda
- Ice
- 1 lemon twist, optional
Instructions
- Shake vodka, blue curaçao, pineapple juice, and lemon juice with ice.
- Strain into a glass filled with fresh ice.
- Top with club soda, stir gently, and garnish with a lemon twist if desired.
Party planning: Measure the ingredients for the number of adult servings you expect, keeping club soda separate until each drink is poured. Label the station “Experimental Compound: Adults Only.”
DIY: Illuminated Specimen Jars
These glowing displays are the signature project for the party. Clear jars hold strange creatures suspended in pale green or blue water, while printable labels make each one look like part of an ongoing research collection. They are particularly effective grouped on a bookshelf or side table where the surrounding light is slightly lower.

The project works best with inexpensive waterproof toy creatures and simple battery-operated lights placed outside the containers. Test one jar before assembling the rest: heavy specimens will settle at the bottom, while hollow toys may float. Either can work, but knowing how they behave helps you plan the display.
Materials
- 4–6 clear jars or sturdy clear plastic containers with secure lids
- Waterproof plastic insects, frogs, dinosaurs, or other toy creatures
- Water
- Green and blue food coloring
- Battery-operated LED display bases or small lights positioned behind the jars
- Printable specimen labels
- Scissors, tape, or adhesive label paper
- A tray and stable display risers, optional
Instructions
- Prepare the containers. Wash and dry the jars, then check that each lid closes securely. Choose several sizes so the finished display has variety.
- Choose the specimens. Place a toy creature in each jar. Use different shapes and colors, leaving enough room around each specimen for it to be visible.
- Tint the water. Mix water with a very small amount of food coloring in a pitcher. Start pale; deeply colored water can hide the specimens and block the light.
- Fill and close. Pour water into each jar, leaving a little space at the top. Secure the lids and wipe the outsides dry.
- Add illumination. Position jars on battery-operated LED display bases or put lights behind them. Keep ordinary lights and battery compartments outside the water.
- Label the discoveries. Print and fold the label cards. Place each in front of the appropriate jar.
- Arrange the collection. Group jars on a tray or stable shelf, using different heights without making the display easy to tip. Test the effect under the party lighting.
A dry variation is useful if you want less water in the room. Put translucent toy creatures or artificial leaves into empty jars and light them from behind. The labels provide the story either way. Treat all specimen displays as decorations, placing them beyond casual reach and away from the drinks.
Activity: Identify the Specimen
The laboratory’s main investigation asks a simple question: can you identify something familiar when you cannot see it? Children feel a mystery ingredient, consider its texture, and choose an answer on a printed specimen card. Ordinary grapes and pasta become surprisingly puzzling when presented as part of an unknown creature.
Explain at the start that the spooky names are pretend and every specimen comes from the kitchen. Children can choose to touch, use gloves, or simply observe the reveal. The goal is shared curiosity, so there is no need to insist that everyone try every container.
Build Your Specimen Collection
For six stations serving 12 participants, the following amounts provide enough to divide among small individual cups. Set one portion at a time inside each concealed station and replace it between players. Adjust quantities if you expect more guests or want larger handfuls.
| Specimen Name | Kitchen Ingredient | Suggested Amount for 12 Players |
| Eyeballs | Peeled green grapes | 36 grapes, 3 per player |
| Tangled Nerves | Cooked, cooled spaghetti | 8 ounces dry spaghetti, cooked and divided |
| Creature Teeth | Dry elbow macaroni | 1½ cups, divided |
| Mutant Skin | Soft cooked cabbage leaves | 6 large leaves, each cut in half |
| Alien Eggs | Cooked, cooled large tapioca pearls | ½ cup dry pearls, cooked according to their package and divided |
| Laboratory Slime | Cornstarch and water | 2 cups cornstarch mixed with about 1 cup water, then divided |
Prepare the cooked ingredients according to their package directions or until soft, then cool and refrigerate. Simmer cabbage leaves in water until pliable, drain, cool, and divide. For the slime, stir water gradually into cornstarch until it forms a thick mixture that firms under pressure and flows when released; add a little more water if needed. This mixture may separate as it stands, so stir before portioning.
Use shallow cups with smooth edges and check ingredient allergies before choosing your specimens. Game portions are for touching and guessing and should be discarded afterward.
Conceal the Samples
Use six opaque boxes large enough to hold a specimen cup. Cut a smooth hand opening in each box, cover cut edges with tape and fasten a loose fabric flap over the opening to hide the contents. Make a separate access flap for the adult replacing the cups.
Number the boxes prominently. Put a tray under each, then place a fresh specimen cup inside before a player begins. Keep the replacement portions covered and chilled when appropriate until they are needed. Small groups make the rotation easier to manage.
Print the Game Sheets
The game sheets list the station number and playful specimen name, followed by three possible kitchen ingredients. Children circle one answer per station.

Play and Reveal
Give each scientist a pencil and game sheet, then invite players to visit the stations in order. Encourage them to describe what they notice: smooth, bumpy, slippery, firm, stretchy, or soft. Have them circle their guesses before moving to the next box.
Once everyone has finished, reveal one specimen at a time and compare observations. A wrong guess can lead to a good conversation about similar textures. For younger children, read the choices aloud. Teams work well when ages vary, and an adult can help record a younger child’s guess without supplying the answer.
Free Printables
Coordinated signs and labels make the scattered experiments feel like parts of the same facility. Use black and white as the readable foundation, with acid-green headings, electric-blue details, and simple silver-gray diagrams. Numbering, graph-paper accents, and mock caution symbols suit the theme especially well.
- Welcome Sign: An “Authorized Personnel Only” welcome sign to place at the entrance of the party. Print actual size (100%) in color on 8.5″x11″ cardstock. Alternatively, use a printing service to print a larger signs.
- Laboratory Access Badges: Print actual size (100%) in color on 8.5″x11″ cardstock. Cut where indicated. Punch a hole at the top center of each badge and attach clips.
- Warning and Caution Signs: Additional decorative signs. Print actual size (100%) in color on 8.5″x11″ cardstock. Alternatively, use a printing service to print a larger signs.
- Food Labels: Print actual size (100%) in color on 8.5″x11″ cardstock. Cut along the edge of the design. Fold food cards in half and place in front of each dish.
- Specimen Jar Labels: Print actual size (100%) in color on 8.5″x11″ cardstock. Cut along the edge of the design and fold where indicated. Prop the appropriate labels in front of each specimen jar.
- Identify the Specimen: Includes game sign, specimen number cards, and game sheets. Print actual size (100%) in color on 8.5″x11″ cardstock. Cut where indicated.
Prep Schedule
The decorations and printables can be completed well ahead, leaving the final day for fresh food and game ingredients. Assemble the parts that are easiest to forget, such as pencils, trays, badge clips, and serving spoons, alongside the items they belong to.
- One week ahead
- Confirm guest count and menu.
- Check ingredient needs with families.
- Gather jars, toys, LED lights, boxes, trays, and food-safe serving containers.
- Print signs, badges, labels, and game cards.
- Two to three days ahead
- Build pipe silhouettes, control panels, and specimen boxes.
- Assemble and test the decorative jars.
- Plan the buffet and game layout.
- One day ahead
- Make crispy-rice treats, pudding, spinach dip, ranch-style dip, and pasta salad.
- Shape and refrigerate slider patties.
- Decorate the main room and organize serving pieces.
- Morning of the party
- Prepare and chill fruit, vegetables, and cooked game ingredients.
- Mix the juice base for punch.
- Finish the entryway, set out badges, and arrange game trays and cards.
- One to two hours before
- Assemble skewers and vegetable cups.
- Portion the pudding and prepare toppings.
- Keep foods refrigerated until needed.
- Prepare individual specimen portions and the cornstarch mixture.
- Just before guests arrive
- Cook slider patties.
- Arrange the first batch of food, add fizz to the punch
- Switch on the specimen lights.
- During the party
- Replenish the buffet and supervise the specimen stations.
- Replace game portions between participants, then gather everyone for the reveal.
Before guests arrive, take one walk through the party from the front door onward. Check that the badges are easy to find, the food labels match their dishes, and the game stations have enough room around them. Those small practical details let you spend more time enjoying the experiments once the laboratory opens.
Open the Laboratory
A memorable Mad Scientist’s Laboratory starts with ordinary things presented in unexpected ways. A jar of colored water becomes a research specimen, a bowl of pasta becomes a brain sample, and a handful of grapes becomes a mystery worth investigating. The glowing colors and playful signs set the scene, while the food and guessing game give guests something to do within it.
Download the coordinated printables, choose your experiments, and welcome your visiting scientists. For more ways to celebrate Halloween at home, explore our Haunted Mansion party guide and Raven’s Feast party guide, each with its own menu, decorating ideas, DIY project, activity, and printable collection.


Leave a Reply