
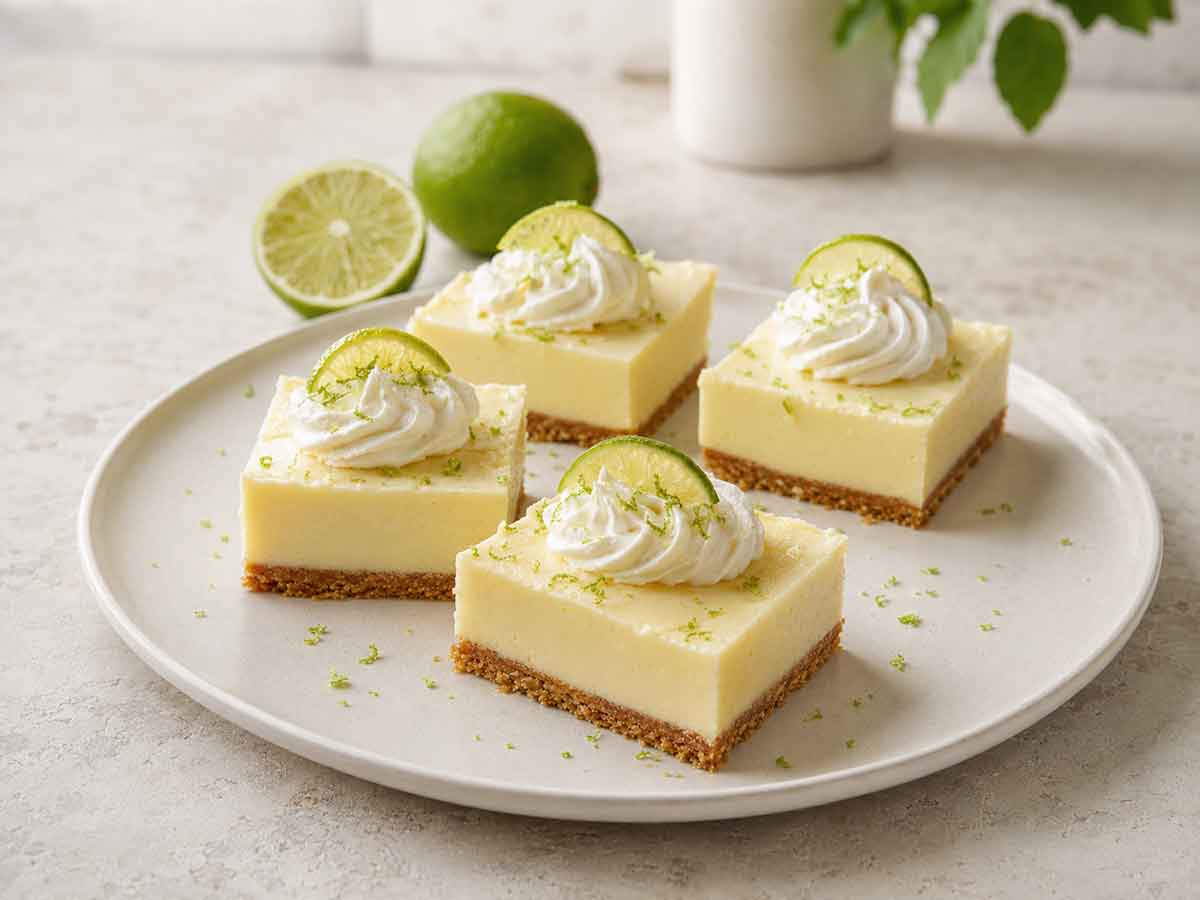
Key lime pie bars capture everything people love about classic Key lime pie—a crisp, buttery graham cracker crust, a smooth citrus filling, and a cool, creamy finish—in a format that is much easier to slice, serve, and share. The filling is pleasantly tart without being overly sharp, while sweetened condensed milk gives it the rich texture and sweetness associated with the traditional pie.
These bars are especially well suited to warm-weather gatherings because they can be prepared well in advance and served straight from the refrigerator. Bring them to a cookout, add them to a backyard dessert bar, or keep a batch chilled for an easy summer treat. A little whipped cream and fresh lime zest are all they need before serving.
Why You’ll Love These Key Lime Pie Bars
Traditional Key lime pie is already a relatively simple dessert, but turning it into bars makes it even more convenient. The square shape is easy to transport, and the chilled slab can be cut into portions of nearly any size. Make larger squares for a plated dessert or smaller bites for a party tray.
The recipe also requires only a short list of familiar ingredients. Although fresh Key limes provide the most distinctive flavor, common limes work beautifully and are much easier to find in most supermarkets. Either way, the result is a creamy, refreshing dessert with enough citrus flavor to balance the sweetness of the condensed milk.
Because the bars need several hours to chill, they are a natural make-ahead option. Bake them the evening before a party, refrigerate them overnight, and cut and garnish them shortly before guests arrive.
Key Limes vs. Common Limes
Key limes are smaller than common limes and tend to have thinner skin, more seeds, and a particularly aromatic flavor. As they ripen, their skin may change from green to a more yellow-green color. Their juice has a floral tartness that gives traditional Key lime desserts their distinctive character.
Common limes are larger, widely available, and much easier to juice. Their flavor is bright and tangy, although it is slightly less floral than that of Key limes. If you cannot find fresh Key limes—or simply do not want to juice the large number required—common limes are an excellent substitute. You can use an equal amount of juice without making any other changes to the recipe.
Whichever variety you choose, freshly squeezed juice will give the filling its liveliest flavor. Bottled Key lime juice can work in a pinch, but fresh zest is still worth adding because it provides the aromatic citrus oils that juice alone cannot.
The Best Crust for Key Lime Pie Bars
A classic graham cracker crust creates the ideal base for these bars. Its lightly toasted, honeyed flavor complements the lime filling without competing with it, while melted butter helps the crumbs hold together once the bars are chilled.
The key to a crust that slices cleanly is to grind the crackers into fine, even crumbs and pack them firmly into the pan. The flat bottom of a measuring cup or drinking glass works well for pressing the mixture into a compact layer. Pay particular attention to the corners and edges, where loosely packed crumbs are more likely to break away.
Briefly pre-baking the crust does two things: It helps the crumbs form a stable base, and it deepens their toasted flavor. The filling can be poured directly over the warm crust, so there is no need to wait for it to cool completely.
For a simple variation, replace a portion of the graham cracker crumbs with crushed vanilla wafers or gingersnap cookies. You can also stir a small amount of finely shredded coconut into the crust for a tropical twist.
How to Make Key Lime Pie Bars
Begin by lining an 8-inch square baking pan with parchment paper, leaving enough overhang on two sides to lift out the finished dessert. This is much easier than trying to cut and remove individual squares directly from the pan.
Next, combine the graham cracker crumbs with sugar, salt, and melted butter. Press the mixture into a firm, even layer and bake it until it smells toasted and the edges are lightly golden.
While the crust bakes, whisk together the sweetened condensed milk, egg yolks, lime zest, fresh lime juice, and a pinch of salt. The lime juice begins thickening the condensed milk as soon as the ingredients are combined, while the egg yolks give the baked filling structure and richness.
Pour the filling over the warm crust and return the pan to the oven. The bars are ready when the edges appear set but the center still jiggles slightly when the pan is moved. The filling should remain pale and creamy rather than browning on top.
Let the bars cool to room temperature before transferring them to the refrigerator. They need at least four hours to become completely firm, although chilling them overnight will produce the cleanest slices.
Recipe: Key Lime Pie Bars
Makes 16 bars
Ingredients
For the Graham Cracker Crust:
- 1½ cups finely ground graham cracker crumbs, from about 10 full graham cracker sheets
- ¼ cup granulated sugar
- ¼ teaspoon salt
- 6 tablespoons unsalted butter, melted
For the Lime Filling:
- 2 (14-ounce) cans sweetened condensed milk
- 5 large egg yolks
- ¾ cup freshly squeezed Key lime juice or common lime juice
- 1 tablespoon finely grated lime zest
- ⅛ teaspoon salt
For Serving:
- Whipped cream
- Finely grated lime zest
- Thin lime slices, cut into small wedges
- Toasted coconut or extra graham cracker crumbs, optional
Instructions
- Preheat the oven to 350°F. Lightly grease an 8-inch square baking pan. Line the pan with parchment paper, leaving an overhang on two opposite sides.
- In a medium bowl, stir together the graham cracker crumbs, granulated sugar, and salt. Add the melted butter and mix until all the crumbs are evenly moistened.
- Transfer the crumb mixture to the prepared pan. Use the bottom of a measuring cup or flat glass to press it firmly and evenly across the bottom of the pan.
- Bake the crust for 9 to 10 minutes, or until it is fragrant and lightly golden around the edges.
- While the crust is baking, place the sweetened condensed milk and egg yolks in a large bowl. Whisk until completely smooth and evenly combined.
- Add the lime juice, lime zest, and salt. Whisk gently until the mixture is smooth and slightly thickened. Avoid whisking vigorously, which can incorporate unnecessary air into the filling.
- Pour the filling over the warm crust and spread it into an even layer.
- Return the pan to the oven and bake for 14 to 17 minutes. The edges should be set, but the center should still have a slight jiggle when the pan is gently moved. Do not wait for the filling to brown.
- Place the pan on a wire rack and allow the bars to cool completely to room temperature.
- Cover the pan and refrigerate the bars for at least 4 hours, or preferably overnight, until thoroughly chilled and firm.
- Run a thin knife along any exposed edges of the pan. Using the parchment overhang, lift the entire chilled slab out of the pan and place it on a cutting board.
- Cut into 16 squares, wiping the knife clean between cuts. Garnish with whipped cream, lime zest, and small lime slices just before serving. Add toasted coconut or graham cracker crumbs, if desired.
Tips for the Best Key Lime Pie Bars
Start by zesting the limes before cutting and squeezing them. It is much easier to grate the zest from a whole, firm lime than from one that has already been juiced. Use only the colored outer portion of the peel and stop before reaching the bitter white pith beneath it.
If you are using Key limes, expect to need considerably more fruit than you would when using common limes. Depending on their size and juiciness, you may need approximately 18 to 24 Key limes to produce ¾ cup of juice. About six to eight common limes should provide the same amount, although yields will vary.
Do not use the appearance of the filling alone to determine whether the bars are done. It should remain pale and may still look slightly soft in the center. A gentle jiggle is ideal; visible liquid movement means the filling needs another minute or two.
Finally, do not rush the chilling time. The filling continues to firm as it cools, and cutting the bars too soon can cause the center to sag or stick to the knife. Overnight chilling is especially helpful when you want picture-perfect squares.
How to Get Clean, Even Slices
For the neatest presentation, make sure the bars are completely cold before removing them from the pan. If they feel at all soft, place them in the freezer for 15 to 20 minutes before slicing. This brief chill firms the filling without freezing it solid.
Use a long, sharp knife to make straight cuts through both the filling and crust. For especially clean edges, run the knife under hot water, dry it thoroughly, and make one cut. Wipe the blade clean and repeat the process before every additional cut.
You can lightly mark the surface before slicing to help keep the portions even. Cut the slab in half in both directions, then divide each quarter into four squares for a total of 16 bars. For a party tray, cut each of those squares in half to create 32 smaller portions.
Make-Ahead and Storage Instructions
Key lime pie bars are an excellent make-ahead dessert because their texture and flavor improve after a long chill. You can bake the bars up to two days before serving and keep them covered in the refrigerator. Wait to add whipped cream, lime slices, or other garnishes until shortly before serving so they stay fresh.
Store leftover bars in an airtight container in the refrigerator for up to four days. If you need to stack them, separate the layers with parchment or wax paper to protect the surface.
The bars can also be frozen. Place the cut, ungarnished bars on a parchment-lined baking sheet and freeze until firm. Transfer them to a freezer-safe container, separating the layers with parchment, and freeze for up to two months. Thaw the bars overnight in the refrigerator before garnishing and serving.
Easy Key Lime Pie Bar Variations
Coconut Key Lime Pie Bars
Add ⅓ cup finely shredded unsweetened coconut to the graham cracker mixture before pressing it into the pan. Finish the chilled bars with toasted coconut for extra flavor and a little texture.
Gingersnap Lime Bars
Replace half or all of the graham cracker crumbs with finely crushed gingersnap cookies. Their warm ginger and molasses notes create a bolder contrast with the tart lime filling.
Chocolate-Dipped Lime Bars
Freeze the cut bars briefly, then dip one edge of each bar into melted white or dark chocolate. Place them on parchment paper and refrigerate until the chocolate sets. White chocolate creates a sweeter, creamier pairing, while dark chocolate offers a more pronounced contrast.
Mini Key Lime Pie Bites
Divide the crust and filling among lined mini muffin cups to make individual treats. Because the portions are smaller, begin checking them several minutes earlier than the full-size bars. Chill them completely before removing the liners.
Extra-Tart Lime Bars
For a stronger citrus flavor, increase the finely grated zest rather than adding more juice. Too much additional liquid could affect how firmly the filling sets, but another teaspoon or two of zest will intensify the lime flavor without changing the texture.
How to Serve Key Lime Pie Bars
These bars are best served chilled, when the filling is cool and creamy and the crust is firm enough to hold each square neatly. Remove them from the refrigerator shortly before serving rather than allowing them to sit at room temperature for an extended period.
A small swirl of whipped cream softens the tartness and gives each bar a finished appearance. Add lime zest for color and aroma, or top each square with a tiny lime wedge. Avoid placing large lime slices on the bars, since they can overwhelm the portions and make them awkward to eat.
For a summer dessert spread, pair the bars with fresh berries, sliced mango, pineapple, or a simple fruit salad. Their bright flavor also makes them a refreshing finish after grilled foods, tacos, seafood, or other rich dishes.
Frequently Asked Questions
Can I use common limes instead of Key limes?
Yes. Common limes produce a bright, delicious filling and can be substituted in an equal amount. Their flavor is slightly less floral than that of Key limes, but most people will still recognize the dessert as having the characteristic sweet-tart flavor of Key lime pie.
Can I use bottled Key lime juice?
Bottled Key lime juice can be used when fresh Key limes are unavailable, but its flavor may be sharper and less fragrant than freshly squeezed juice. For the freshest result, add finely grated zest from a fresh Key lime or common lime to the filling.
Why didn’t my filling set?
A loose filling may be the result of underbaking, inaccurate measurements, or insufficient chilling. The bars need to bake until the outer portion is set and the center has only a slight jiggle. They must then cool completely and chill for at least four hours before cutting.
Why is my graham cracker crust crumbly?
A crumbly crust is usually caused by crumbs that were too coarse, insufficient butter, or not pressing the mixture firmly enough into the pan. Grind the crackers finely, measure the crumbs after grinding, and compact the mixture with a flat-bottomed cup before baking.
Can I make Key lime pie bars without eggs?
The egg yolks cannot simply be omitted because they help the filling set during baking. An egg-free version would require a different recipe that uses another thickener, such as cornstarch, gelatin, or a combination of cream cheese and whipped cream.
Do Key lime pie bars need to be refrigerated?
Yes. Because the filling contains eggs and sweetened condensed milk, the bars should remain refrigerated. Keep them chilled until shortly before serving and return any leftovers to the refrigerator promptly.
A Refreshing Dessert Made for Sharing
Key lime pie bars combine a crisp graham cracker crust with a smooth, creamy filling that strikes just the right balance between sweet and tart. They have all the appeal of a classic Key lime pie, but their easy-to-cut shape makes them especially practical for parties, picnics, showers, and backyard gatherings.
Make them the day before you plan to serve them, let them chill overnight, and finish each square with a little whipped cream and fresh lime zest. The result is a bright, refreshing dessert that feels special without requiring a complicated preparation.



Leave a Reply