Crisp crust. Open crumb. A chewy interior with irregular air pockets that feel bakery-level impressive. What many home bakers don’t realize is that this style of bread—often labeled “artisan”—doesn’t require advanced skill. It requires understanding.
Artisan bread is defined less by complexity and more by method: higher hydration dough, gentle handling, proper fermentation, and steam during baking. Instead of aggressive kneading, we rely on time and a simple stretch-and-fold technique to develop structure. The result is a rustic loaf with depth of flavor and beautiful texture.
This guide walks through the ingredients, the science, and the process—so you understand not just how to make it, but why it works.
The Four Essential Ingredients (And What They Actually Do)
At its core, artisan bread uses just four ingredients: flour, water, yeast, and salt. Each plays a precise role.
Flour: Structure and Strength
Flour provides the framework of bread. Its protein content determines how much gluten can form when mixed with water. Gluten is what traps the gas produced by yeast, allowing the dough to rise and hold its shape.
Bread flour contains more protein than all-purpose flour, typically around 12–13%, which promotes stronger gluten development and a chewier crumb. All-purpose flour works well too, producing a slightly softer texture. Either can make excellent artisan bread, but bread flour offers a bit more structure—especially helpful in higher hydration doughs.
You can incorporate whole wheat flour for added flavor and depth, but because it absorbs more water and can weaken gluten structure, it’s best introduced gradually once you’re comfortable with the base recipe.
Water: Hydration and Texture
Water activates everything. It hydrates the flour, allowing gluten to form. It dissolves salt. It wakes up the yeast. The ratio of water to flour—called hydration—has a major impact on texture.
Artisan bread typically uses higher hydration than sandwich loaves. This makes the dough wetter and stickier than many beginners expect, but that moisture is what produces an open, airy crumb. The dough may look shaggy and loose at first. That’s correct.
Water temperature also matters. Room-temperature water works well for most situations. Warmer water speeds fermentation; cooler water slows it down.
Yeast: Fermentation and Flavor
Yeast is a living microorganism that consumes sugars in flour and produces carbon dioxide and organic acids. The gas creates rise. The acids create flavor.
Instant yeast and active dry yeast both work in this recipe. Instant yeast can be mixed directly with flour. Active dry yeast should be dissolved in water first. Because artisan bread relies on longer fermentation, only a small amount of yeast is needed.
Slower fermentation develops deeper flavor. This is why an overnight rise often produces a more complex loaf.
Salt: Flavor and Fermentation Control
Salt does more than enhance taste. It strengthens gluten structure and regulates yeast activity. Without salt, dough ferments too quickly and lacks depth.
It’s a small ingredient with a major structural role. Reducing it significantly changes both flavor and texture.
The Stretch & Fold
Traditional kneading aggressively develops gluten through mechanical force. Artisan bread takes a gentler approach.
After mixing flour, water, yeast, and salt until no dry flour remains, the dough rests briefly. During bulk fermentation, you perform a series of stretch-and-folds—typically 3 to 4 rounds spaced about 20–30 minutes apart.
To stretch and fold:
- Wet your hands.
- Lift one edge of the dough.
- Stretch it upward gently.
- Fold it over onto itself.
- Rotate the bowl and repeat 3–4 times.
This simple action strengthens gluten gradually while preserving airiness. With each round, the dough becomes smoother, more elastic, and more cohesive. You’ll feel the transformation.
After the final stretch-and-fold, the dough continues rising undisturbed.
Fermentation Options: Same Day or Overnight
One of the most flexible aspects of artisan bread is timing. You can bake it the same day or let it develop flavor overnight in the refrigerator.
Room-Temperature Fermentation (Same-Day Bread)
After stretch-and-fold rounds are complete, allow the dough to rise at room temperature until it increases in volume by roughly 50–75% and appears airy and slightly jiggly. This typically takes 3–5 hours, depending on room temperature.
Signs it’s ready:
- Visible bubbles beneath the surface
- Soft, pillowy texture
- Dough that holds shape but feels aerated
This method is faster and produces a mild, clean flavor.
Overnight Cold Fermentation (Enhanced Flavor)
For deeper flavor, cover the dough tightly and refrigerate after the stretch-and-fold phase. It can remain in the fridge for 8–24 hours.
Cold temperatures slow yeast activity but allow organic acids to develop more fully. The result is improved flavor complexity and often better structure.
When ready to bake:
- Remove dough from fridge.
- Let it sit at room temperature for 30–60 minutes.
- Proceed with shaping.
Cold dough is often easier to handle and score.
Shaping and Final Proof
Turn the dough onto a lightly floured surface. Handle gently to preserve air pockets. Shape into a loose round by folding edges toward the center, then flip seam-side down and use your hands to create surface tension by gently pulling the dough toward you.
Place seam-side up in a floured proofing basket or bowl lined with a floured towel.
Let it proof 30–90 minutes, depending on temperature and whether it came from the fridge.
The poke test helps determine readiness: gently press the dough. If it springs back slowly and leaves a slight indentation, it’s ready.
Baking for Crust and Oven Spring
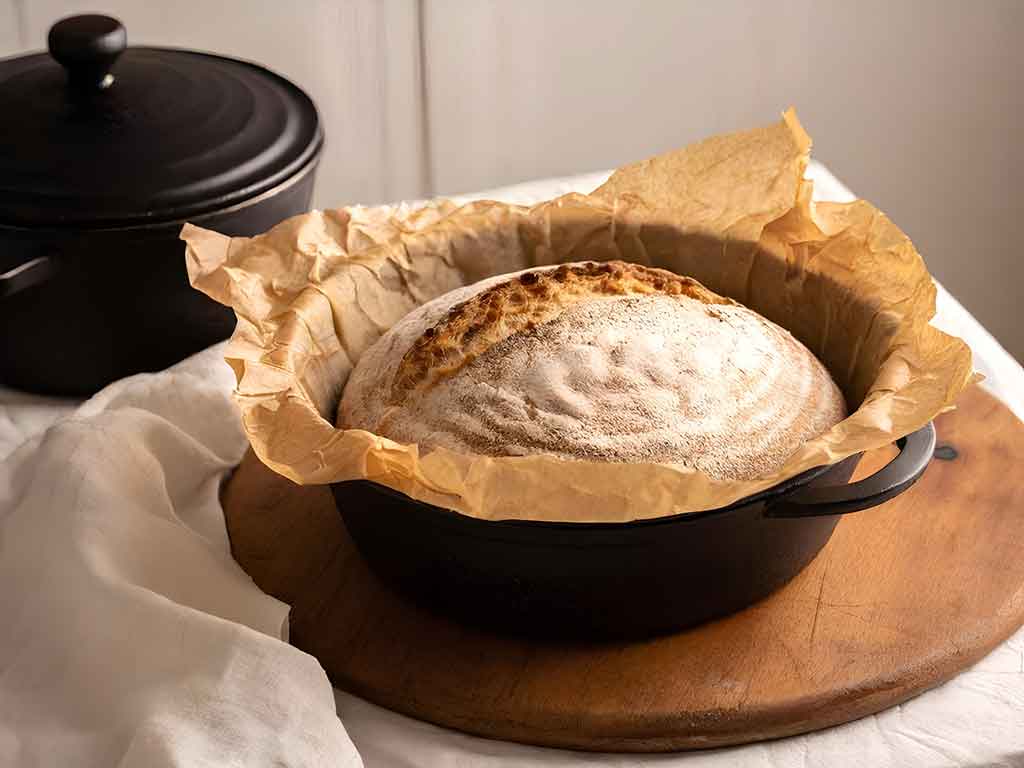
A Dutch oven creates the ideal baking environment by trapping steam released from the dough. Steam delays crust formation, allowing maximum expansion before the crust sets.
Preheat the Dutch oven at 450°F for at least 30 minutes.
Carefully transfer the dough onto parchment, score the top with a sharp blade, and lower it into the hot pot. Cover and bake 20–25 minutes. Then remove the lid and bake an additional 15–20 minutes until deeply golden brown.
The internal temperature should reach about 205–210°F.
Cool completely before slicing. Cutting too soon can result in a gummy interior.
Recipe: Artisan Bread Loaf
Makes 1 round loaf
Ingredients
- 3 cups (375g) bread flour or all-purpose flour
- 1¼ teaspoons salt
- ½ teaspoon instant yeast
- 1½ cups (360g) room-temperature water
Instructions
- In a large bowl, combine flour, salt, and yeast.
- Add water and mix until no dry flour remains. Dough will be sticky.
- Cover and rest for 20 minutes.
- Perform a stretch-and-fold, cover and rest for 30 minutes.
- Repeat the stretch-and-fold step three more times.
- After the final stretch-and-fold, cover and allow the dough to continue rising at room temperature for 2–3 more hours (or refrigerate overnight).
- Remove the dough from the bowl and shape into a round. Place the round on a large piece of parchment paper, cover loosely with a clean kitchen towel and proof for 30–90 minutes.
- Place a lidded Dutch oven into the oven while heating to 450°F.
- Remove the Dutch oven after 20-30 minutes and carefully remove the lid. Use the parchment paper to lift and gently drop the dough into the Dutch oven (the parchment paper goes into the Dutch oven as well).
- Cover and return to the oven to bake for 20–25 minutes.
- Remove the lid and bake 15–20 minutes more.
- Remove the Dutch oven and use the parchment paper to lift and transfer the bread to a cooling rack.
- Cool fully before slicing.
Troubleshooting Common Issues
- Dense crumb usually means under-fermentation or low hydration. A wetter, stickier dough is better than a dry dough when it comes to artisan bread. Resist the urge to add flour if the dough is sticky. If the dough sticks to your fingers during the stretch-and-folds, thoroughly wet your hands before each stretch. This will prevent sticking and add a little more hydration to the dough.
- A flat loaf often signals over-proofing or insufficient structure. Really lift and stretch the dough during the stretch-and-folds. Look for visual clues rather than following exact proofing timelines. The dough should be noticeably larger and more voluminous after each rise. If that happens before the suggested time, move on to the next step. After the final proof, be gentle when transferring the bread to the oven. Big movements like plopping the dough into the Dutch oven can deflate it.
- Pale crust may indicate insufficient baking time or low oven temperature. Recipes are guidelines. If your bread is still pale at the end of the recommended cooking time, increase the oven temperature 5-10 degrees and bake longer, checking on the bread every 3-4 minutes until it reaches the desired color.
- A gummy interior typically results from slicing before the loaf has cooled completely. It’s hard to deny cutting into hot bread, fresh out of the oven. But the cooling time allows the bread to reach the right consistency.
Each bake teaches you something. Small adjustments make big differences.
Where to Go From Here
Once you’re comfortable with this basic artisan bread recipe, you can experiment with:
- 10–20% whole wheat flour
- Adding seeds during final folds
- Longer cold fermentation (up to 48 hours)
- Slightly increasing hydration
- Baking smaller boules
Artisan bread rewards repetition. It’s not about perfection—it’s about learning how flour, water, yeast, and salt behave together over time.
And once you understand that, you’re no longer just following a recipe. You’re baking with intention.


Leave a Reply