Valentine’s Day is one of the best times to work with chocolate because simple preparations feel special. Dipped strawberries, chocolate bark, and homemade truffles all rely on the same basic techniques outlined here. Even a small dessert spread with hot chocolate, chocolate-dipped cookies, and a simple ganache instantly feels celebratory.
But chocolate has a reputation for being intimidating and is one of the most common sources of frustration in the kitchen. Chocolate can scorch, seize, or turn grainy with very little warning, leaving even experienced home cooks feeling unsure of themselves.
This guide is meant to remove that anxiety. Rather than focusing on professional pastry techniques, this article is about working with chocolate successfully at home. We’ll cover how to choose the right chocolate, how to melt it properly, and how to avoid (or fix) the most common problems. With a few fundamentals in place, chocolate becomes one of the most versatile and forgiving ingredients you can use, especially for Valentine’s desserts, gifts, and entertaining.
Understanding Chocolate Basics
At its core, chocolate is made from cocoa solids and cocoa butter, combined with sugar and sometimes milk. The percentage listed on a chocolate label refers to the total amount of cocoa solids and cocoa butter in the chocolate. A higher percentage means a more intense, less sweet chocolate flavor, while a lower percentage signals more sugar and a creamier taste.
For home cooks, the most important rule is simple: use chocolate you enjoy eating on its own. Melting or baking doesn’t improve the flavor of chocolate, it concentrates it. If a chocolate tastes flat, overly sweet, or unpleasant straight from the wrapper, it will taste the same or worse once melted.
Form also matters. Chocolate bars, baking wafers, and chocolate chips are not interchangeable in every situation. Chips are formulated to hold their shape in cookies, which makes them less ideal for smooth melting. Bars and wafers are designed to melt evenly and are generally the better choice for dipping, drizzling, and ganache.
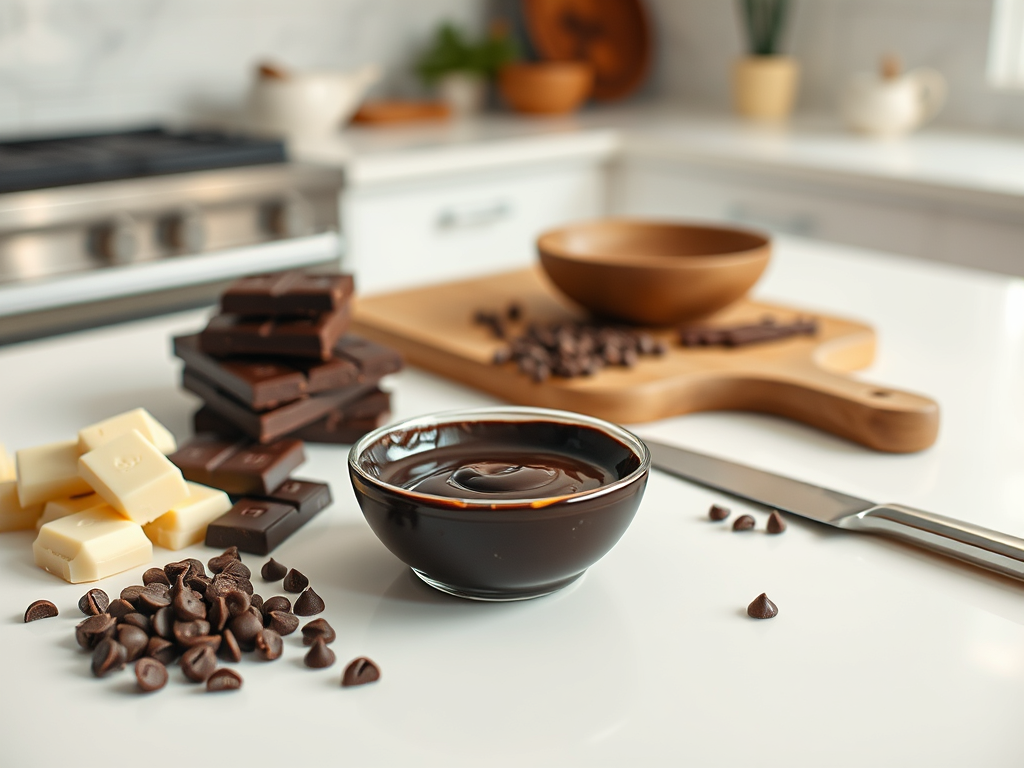
Types of Chocolate and When to Use Them
Dark Chocolate
Dark chocolate contains cocoa solids, cocoa butter, and sugar, but no milk solids. It has the most pronounced chocolate flavor and melts smoothly when handled gently. Because it sets firmly as it cools, dark chocolate is ideal for truffles, dipped strawberries, bark, and desserts where structure matters. It’s also forgiving compared to milk or white chocolate, making it a good starting point if you’re still building confidence.
Milk Chocolate
Milk chocolate includes milk solids, which make it sweeter and softer than dark chocolate. That sweetness makes it especially appealing for candy-style desserts, bark, and crowd-pleasing treats. The tradeoff is sensitivity: milk solids scorch more easily, so milk chocolate requires lower heat and closer attention when melting.
White Chocolate
White chocolate is made from cocoa butter, sugar, and milk solids, but no cocoa solids. This gives it a creamy flavor and pale color, but also makes it the most temperamental of the three. White chocolate burns and seizes quickly if overheated. When treated gently, it works beautifully for drizzling, decorative accents, and sweet, creamy desserts.
Chocolate Chips, Bars, and Wafers
Chocolate chips are formulated with a specific purpose in mind: they’re designed to hold their shape in the oven. To achieve this, manufacturers often adjust the ratio of cocoa butter to cocoa solids and may include stabilizers such as soy lecithin or use less cocoa butter overall. The result is a chip that softens when heated but doesn’t fully melt or spread. This is exactly what you want in cookies, muffins, and quick breads, where distinct pockets of chocolate are part of the appeal.
That same formulation is what makes chocolate chips less ideal for melting smoothly. With less cocoa butter, chips can melt unevenly, becoming thick or slightly grainy rather than fluid and glossy. They’ll still melt, but the texture is often too stiff for dipping, coating, or creating a silky ganache.
Chocolate bars and baking wafers, on the other hand, are designed to melt. They typically contain a higher proportion of cocoa butter, which is what gives melted chocolate its smooth, pourable texture. When chopped into even pieces or used in wafer form, this chocolate melts more evenly and predictably, making it far easier to work with for sauces, glazes, truffles, and dipped treats.
Baking wafers are essentially pre-portioned chocolate formulated specifically for melting. Because they’re uniform in size and thickness, they heat at the same rate, reducing the risk of hot spots or scorching. For home cooks who want reliable results without extra effort, wafers are often the most forgiving option.
Despite the name, almond bark products do not contain almonds. It’s a compound chocolate that uses vegetable fats instead of cocoa butter. While it lacks the depth of real chocolate, it melts easily and sets without tempering. For quick projects or casual treats where ease matters more than flavor complexity, it can be a practical option.
Understanding these differences helps explain why a recipe may call for “chopped chocolate” rather than chips. It’s not about being fussy, it’s about choosing a form of chocolate that behaves the way the recipe expects.
Melting Chocolate Successfully
Melting chocolate is where most problems begin, but the process itself is straightforward when you keep heat low and controlled. Chocolate doesn’t like sudden temperature changes or direct high heat, which is why slow, gentle methods are best.
The two most reliable approaches are a double boiler and the microwave. A double boiler offers the most control, using steam heat to melt chocolate gradually. The microwave is faster and perfectly effective, but only when used in short intervals with frequent stirring. In both cases, chocolate should be removed from the heat while a few small pieces are still unmelted and stirred until smooth. Residual heat will finish the job without risking scorching.
Different projects call for slightly different textures. Chocolate for dipping should be fluid and glossy, while chocolate for ganache needs to be fully melted and ready to combine with warm cream. Paying attention to the final use helps guide how gently and thoroughly the chocolate should be melted.
Common Chocolate Problems (and How to Fix Them)
Chocolate is sensitive to both heat and moisture, which explains most common issues.
Seizing happens when even a small amount of water or steam comes into contact with melted chocolate. The chocolate suddenly turns thick and grainy. While seized chocolate can’t be used for dipping, it can often be rescued by adding a small amount of warm cream or butter and turning it into a sauce or ganache.
Overheating causes chocolate to become dull, grainy, or stiff. Once chocolate is truly scorched, it can’t be fixed, which is why stopping early and stirring frequently is so important.
Chocolate that won’t set is usually too warm or hasn’t been tempered. For casual desserts, chilling briefly in the refrigerator can help, but for gifts and decorative pieces, proper tempering or using compound chocolate may be a better solution.
Understanding these problems makes them far less intimidating. Most are preventable, and many are recoverable when you know what went wrong.
Do You Need to Temper Chocolate?
Tempering is the process of heating and cooling chocolate to stabilize the cocoa butter crystals, resulting in a glossy finish and a firm snap. While it’s essential for professional chocolate work, it’s not required for most home baking.
You can skip tempering for:
- Brownies, cakes, and cookies
- Ganache, sauces, and fillings
- Desserts that will be refrigerated or served immediately
Tempering becomes worthwhile when you’re making chocolate gifts, dipped treats, or decorative elements that need to look polished and hold up at room temperature. Even then, many home cooks choose simpler methods or opt for compound chocolate to avoid the extra steps.
Stress-Free Chocolate Success
Working with chocolate becomes much easier when expectations are realistic. Buy a little extra chocolate so mistakes don’t feel costly. Read labels, choose quality ingredients, and keep heat low. Most importantly, start simple. Chocolate doesn’t need elaborate techniques to be impressive. With a few fundamentals mastered, it quickly becomes one of the most satisfying ingredients to work with, both for everyday treats and special occasions.


Leave a Reply